PlaFRIM Users Documentation
Table of Contents
- 1. How to properly use the platform
- 2. Other Platforms
- 3. Hardware Documentation
- 3.1. Overview
- 3.2. Standard nodes
- 3.3. Accelerated nodes
- 3.3.1. Which CUDA module to load?
- 3.3.2. sirocco01-05 with 3-4 NVIDIA K40M GPUs
- 3.3.3. sirocco06 with 2 NVIDIA K40M GPUs
- 3.3.4. sirocco07-13 with 2 NVIDIA P100 GPUs
- 3.3.5. sirocco14-16 with 2 NVIDIA V100 GPUs and a NVMe disk
- 3.3.6. sirocco17 with 2 NVIDIA V100 GPUs and 1TB memory
- 3.3.7. sirocco18-20 with 2 NVIDIA Quadro RTX8000 GPUs
- 3.3.8. sirocco21 with 2 NVIDIA A100 GPUs
- 3.3.9. sirocco22-25 with 2 NVIDIA A100 GPUs
- 3.3.10. suet01 with 2 Intel Flex 170 GPUs
- 3.3.11. suet02 with 2 Intel Max 1100 GPUs
- 3.3.12. kona01-04 Knights Landing Xeon Phi
- 3.4. Big Memory Nodes
- 4. Software Documentation
- 4.1. Operating System
- 4.2. Slurm
- 4.2.1. Getting Information About Available Nodes
- 4.2.2. How to select nodes and how long to use them?
- 4.2.3. Which node(s) do I get by default?
- 4.2.4. Running Interactive Jobs
- 4.2.5. Environment variables
- 4.2.6. Running Non-Interactive (Batch) Jobs
- 4.2.7. Getting Information About A Job
- 4.2.8. Asking for GPU nodes
- 4.2.9. Killing A Job
- 4.2.10. Launching multi-prog jobs
- 4.2.11. Submitting many jobs without flooding the platform
- 4.3. Preemption queue
- 4.4. Modules
- 4.4.1. Introduction
- 4.4.2. Module Naming Policy
- 4.4.3. Dev and Users Modules
- 4.4.4. How to Create a Module
- 4.4.5. What are the useful variables?
- 4.4.6. Which version gets selected by default during load?
- 4.4.7. More on environment dependent modules
- 4.4.8. More module commands
- 4.4.9. Module tools/module_cat
- 4.5. Parallel Programming (MPI)
- 4.6. Software management with GNU Guix
- 4.7. 3D Visualization with VirtualGL and TurboVNC
- 4.8. IRODS Storage Resource
- 4.9. Continuous integration
- 4.9.1. May I run a Continuous Integration (CI) daemon on PlaFRIM?
- 4.9.2. Which software projects are eligible for CI on PlaFRIM?
- 4.9.3. Creating a PlaFRIM CI manager for a gitlab project
- 4.9.4. Configuring a gitlab-runner
- 4.9.5. Waiting for my SLURM jobs to end
- 4.9.6. Improving reproducibility
- 4.9.7. What is allowed in CI jobs?
- 4.9.8. What if my CI job performs quite a lot of I/O?
- 4.9.9. Do I need to restart my runner manually in case of hardware problem?
- 4.9.10. May I share a gitlab CI PlaFRIM account between multiple developers?
- 4.10. Energy savings (
under TESTING ) - 4.11. Other Development Tools
- 5. Incoming and Outgoing Access
- 6. Storage
- 7. Misc
1. How to properly use the platform
The user's charter for the use of the platform is available https://www.plafrim.fr/wp-content/uploads/2015/09/2015_09_charte_plafrim_en.pdf.
Here an excerpt with the good usage rules
- Please try to plan large scale experiments during night-time or holidays.
- Between 09:00 and 19:00 (local time of the cluster) during working days, you should not use more than the equivalent of 5 hours on all the cores of a sub-cluster (for instance bora) during a given day. e.g. On a 68 bi-processor (quadri cores) cluster, you should not use more than 5*2*4*68 = 2720h between 09:00 and 19:00 CEST for a potential amount of 5440h during this period). Extending an overnight reservation to include this daily quota is considered rude, as you already had your fair share of platform usage with the overnight reservation.
- You should not have more than 3 reservations in advance, because it kills down resource usage. Please optimize and submit jobs instead.
- You should not have jobs that last more than 72h outside week-end, even for a small amount of nodes, as this increases fragmentation of the platform.
If you need to run many large/long jobs, you should consider moving to a larger production cluster such as a mesocentre. Please remember that PlaFRIM is an experimentation platform.
See also how to avoid flooding the platform with too many jobs.
2. Other Platforms
Other HPC clusters accessible:
- Grid5000: Many different small clusters ; Get an account
- MCIA: CPUs Intel Skylake ; Get an account
- CALI: GPUs Nvidia GTX 1080 Ti, L40 ou H100 ; Get an account
3. Hardware Documentation
PlaFRIM aims to allow users to experiment with new hardware technologies and to develop new codes.
Access to the cluster state (sign-in required) : Pistache
You will find below a list of all the available nodes on the platform by category.
To allocate a specific category of node with SLURM, you need to specify the node features. To display the list, call the command
$ sinfo -o "%60f %N" -S N
AVAIL_FEATURES                                               NODELIST
arm,cavium,thunderx2                                         arm01
bora,intel,cascadelake,omnipath                              bora[001-044]
brise,intel,broadwell,bigmem                                 brise
amd,zen2,diablo,mellanox                                     diablo[01-04]
amd,zen2,diablo,bigmem,mellanox                              diablo05
amd,zen3,diablo,bigmem,mellanox                              diablo[06-09]
kona,intel,knightslanding,knl,omnipath                       kona[01-04]
miriel,intel,haswell,omnipath,infinipath                     miriel[002-004,006,009,011-015,018,021,023,025-026,028-031,033-037]
mistral                                                      mistral[02-03,06]
sirocco,intel,haswell,mellanox,nvidia,tesla,k40m             sirocco[01-05]
sirocco,intel,broadwell,omnipath,nvidia,tesla,p100           sirocco[07-13]
sirocco,intel,skylake,omnipath,nvidia,tesla,v100             sirocco[14-16]
sirocco,intel,skylake,omnipath,nvidia,tesla,v100,bigmem      sirocco17
sirocco,intel,skylake,nvidia,quadro,rtx8000                  sirocco[18-20]
sirocco,amd,zen2,nvidia,ampere,a100                          sirocco21
sirocco,amd,zen3,nvidia,ampere,a100                          sirocco[22-25]
suet,intel,icelake,intelgpu,gpuflex,flex170                  suet01
suet,intel,sapphirerapids,intelgpu,gpumax,max1100            suet02
souris,sgi,ivybridge,bigmem                                  souris
visu                                                         visu01
amd,zen2,zonda                                               zonda[01-21]
For example, to reserve a bora node, you need to call
$ salloc -C bora
To reserve a sirocco node with V100 GPUs, you need to call
$ salloc -C "sirocco&v100"
To reserve a big-memory (1TB) diablo node:
$ salloc -C "diablo&bigmem"
3.1. Overview
| CPU | Memory | GPU | Storage | |
|---|---|---|---|---|
| bora001-044 | 2x 18-core Intel CascadeLake | 192GB | /tmp of 1 To | |
| miriel001-088 | 2x 12-core Intel Haswell | 128 GB | /tmp of 300 GB | |
| diablo01-04 | 2x 32-core AMD Zen2 | 256 GB | /tmp of 1 TB | |
| diablo05 | 2x 64-core AMD Zen2 | 1 TB | /tmp of 1 TB | |
| diablo06-09 | 2x 64-core AMD Zen3 | 1 TB | /scratch of 4 TB | |
| zonda01-21 | 2x 32-core AMD Zen2 | 256 GB | ||
| arm01 | 2x 28-core ARM TX2 | 256 GB | /tmp of 128 GB | |
| sirocco01-02,05 | 2x 12-core Intel Haswell | 128 GB | 4 NVIDIA K40M | /tmp of 1 TB |
| sirocco03-04 | 2x 12-core Intel Haswell | 128 GB | 3 NVIDIA K40M | /tmp of 1 TB |
| sirocco06 | 2x 10-core Intel IvyBridge | 128 GB | 2 NVIDIA K40M | /tmp of 1 TB |
| sirocco07-13 | 2x 16-core Intel Broadwell | 256 GB | 2 NVIDIA P100 | /tmp of 300 GB |
| sirocco14-16 | 2x 16-core Intel Skylake | 384 GB | 2 NVIDIA V100 | /scratch of 750 GB |
| sirocco17 | 2x 20-core Intel Skylake | 1 TB | 2 NVIDIA V100 | /tmp of 1 TB |
| sirocco18-20 | 2x 20-core Intel CascadeLake | 192 GB | 2 NVIDIA Quadro | |
| sirocco21 | 2x 24-core AMD Zen2 | 512 GB | 2 NVIDIA A100 | /scratch of 3.5 TB |
| sirocco22-25 | 2x 32-core AMD Zen3 | 512 GB | 2 NVIDIA A100 | /scratch of 4 TB |
| suet01 | 2x 28-core Intel IceLake | 256 GB | 2 Intel DataCenter GPU Flex 170 | /scratch of 1 TB |
| suet02 | 2x 56-core Intel SapphireRapids | 512 GB | 2 Intel DataCenter GPU Max 1100 | |
| kona01-04 | 64-core Intel Xeon Phi | 96GB + 16GB | /scratch of 800 GB | |
| brise | 4x 24-core Intel Broadwell | 1TB | /tmp of 280 GB | |
| souris | 12x 8-core Intel IvyBridge | 3TB |
3.1.1. Network Overview
All nodes are connected through a 10Gbit/s Ethernet network that may also be used for the BeeGFS storage. The only exception are kona nodes since they only have 1Gbit/s Ethernet.
Additional HPC networks are available between some nodes:
OmniPath 100Gbit/s (3 separate networks):
- bora nodes (and devel[01-02]), also used for BeeGFS storage.
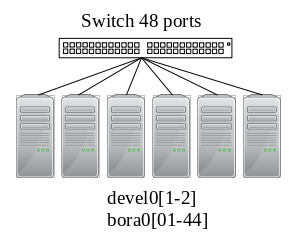
- miriel[01-43] (and devel03).
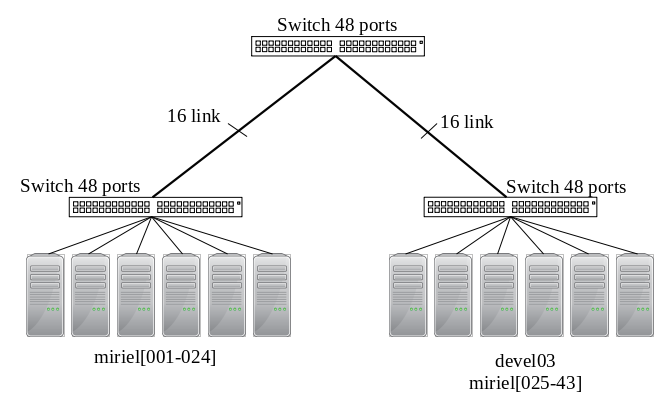
- sirocco[07-17] and all kona only
Mellanox InfiniBand HDR 200Gbit/s between diablo[01-09].
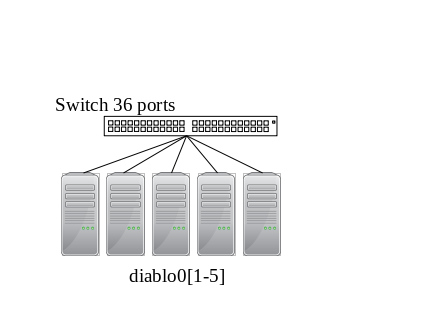
InfiniBand QDR 40Gbit/s between all miriel nodes and sirocco[01-06] (and devel03).
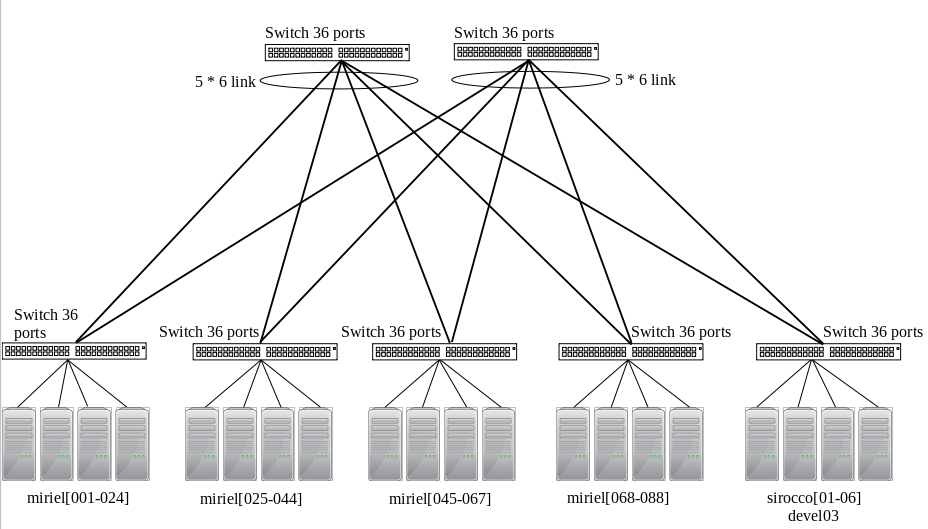
Beware that miriel and devel03 have TrueScale/InfiniPath hardware that requires its own software stack (PSM) for best performance, while Mellanox InfiniBand in sirocco requires the usual Verbs library. These technologies are compatible but the performance will be suboptimal between miriel and sirocco.
3.2. Standard nodes
3.2.1. bora001-044
- CPU
2x 18-core Cascade Lake Intel Xeon Skylake Gold 6240 @ 2.6 GHz (CPU specs).
By default, Turbo-Boost and Hyperthreading are disabled to ensure the reproducibility of the experiments carried out on the nodes.
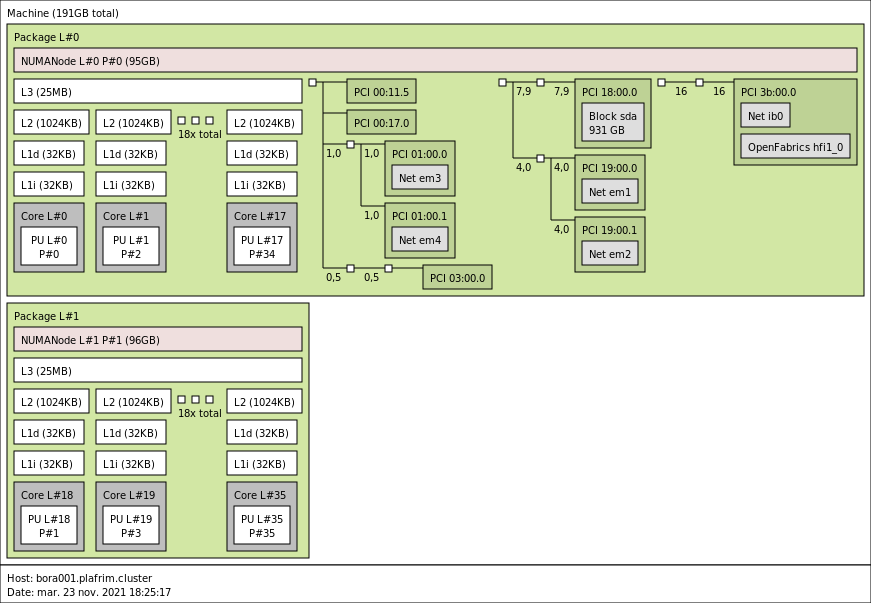
- Memory
- 192 GB (5.3 GB/core) @ 2933 MT/s.
- Network
OmniPath 100 Gbit/s.
10 Gbit/s Ethernet.
- Storage
Local disk (/tmp) of 1 To (SATA Seagate ST1000NX0443 @ 7.2krpm).
BeeGFS over 100G OmniPath.
3.2.2. miriel001-088
These nodes are in best effort and without support, and will be removed from the platform when failing to start.
- CPU
2x 12-core Haswell Intel Xeon E5-2680 v3 @ 2.5 GHz. Haswell specs.
By default, Turbo-Boost and Hyperthreading are disabled to ensure the reproducibility of the experiments carried out on the nodes.
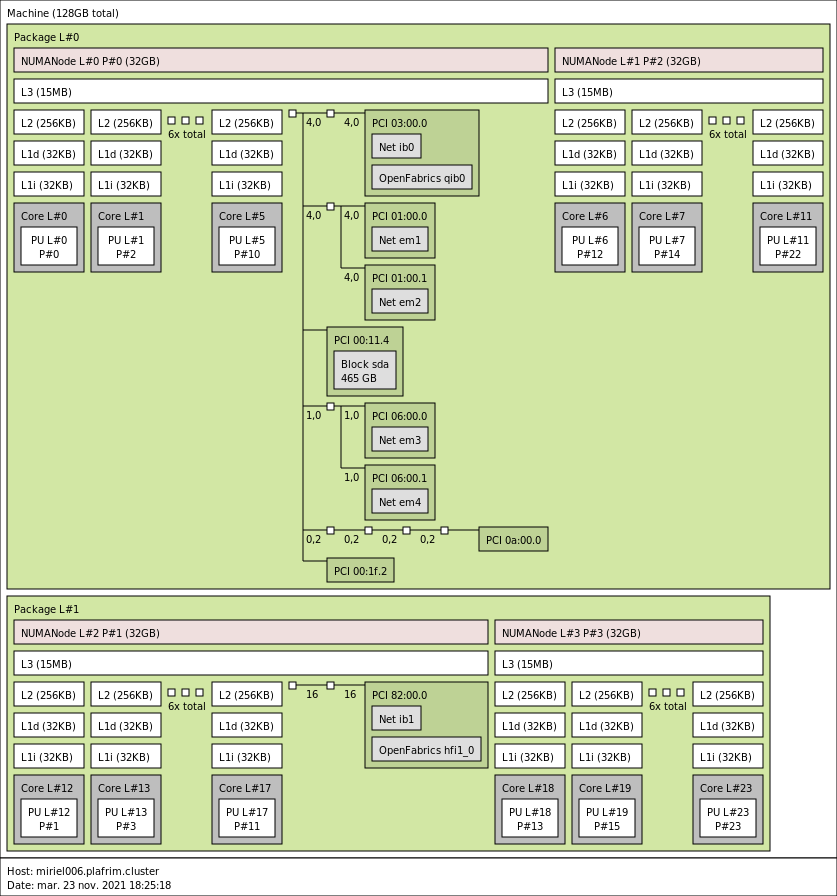
- Memory
- 128 GB (5.3 GB/core) @ 2933 MT/s.
- Network
OmniPath 100 Gbit/s on miriel[001-043].
InfiniBand QDR 40 Gbit/s (TrueScale/InfiniPath).
10 Gbit/s Ethernet.
- Storage
Local disk (/tmp) of 300 GB (SATA Seagate ST9500620NS @ 7.2krpm).
BeeGFS over 10G Ethernet.
3.2.3. diablo01-09
- CPU
2x 32-core AMD Zen2 EPYC 7452 @ 2.35 GHz on diablo01-04 (CPU specs).
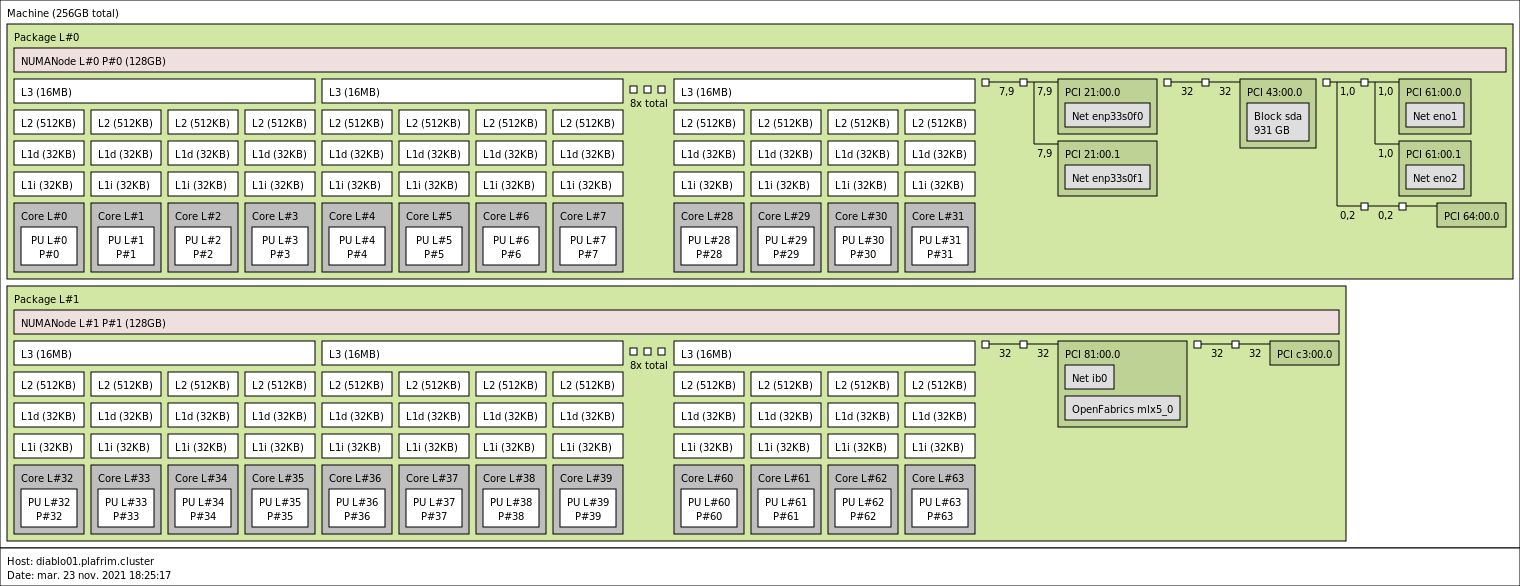
2x 64-core AMD Zen2 EPYC 7702 @ 2 GHz on diablo05 (CPU specs).

2x 64-core AMD Zen3 EPYC 7763 @ 2.45 GHz on diablo06-09 (CPU specs).
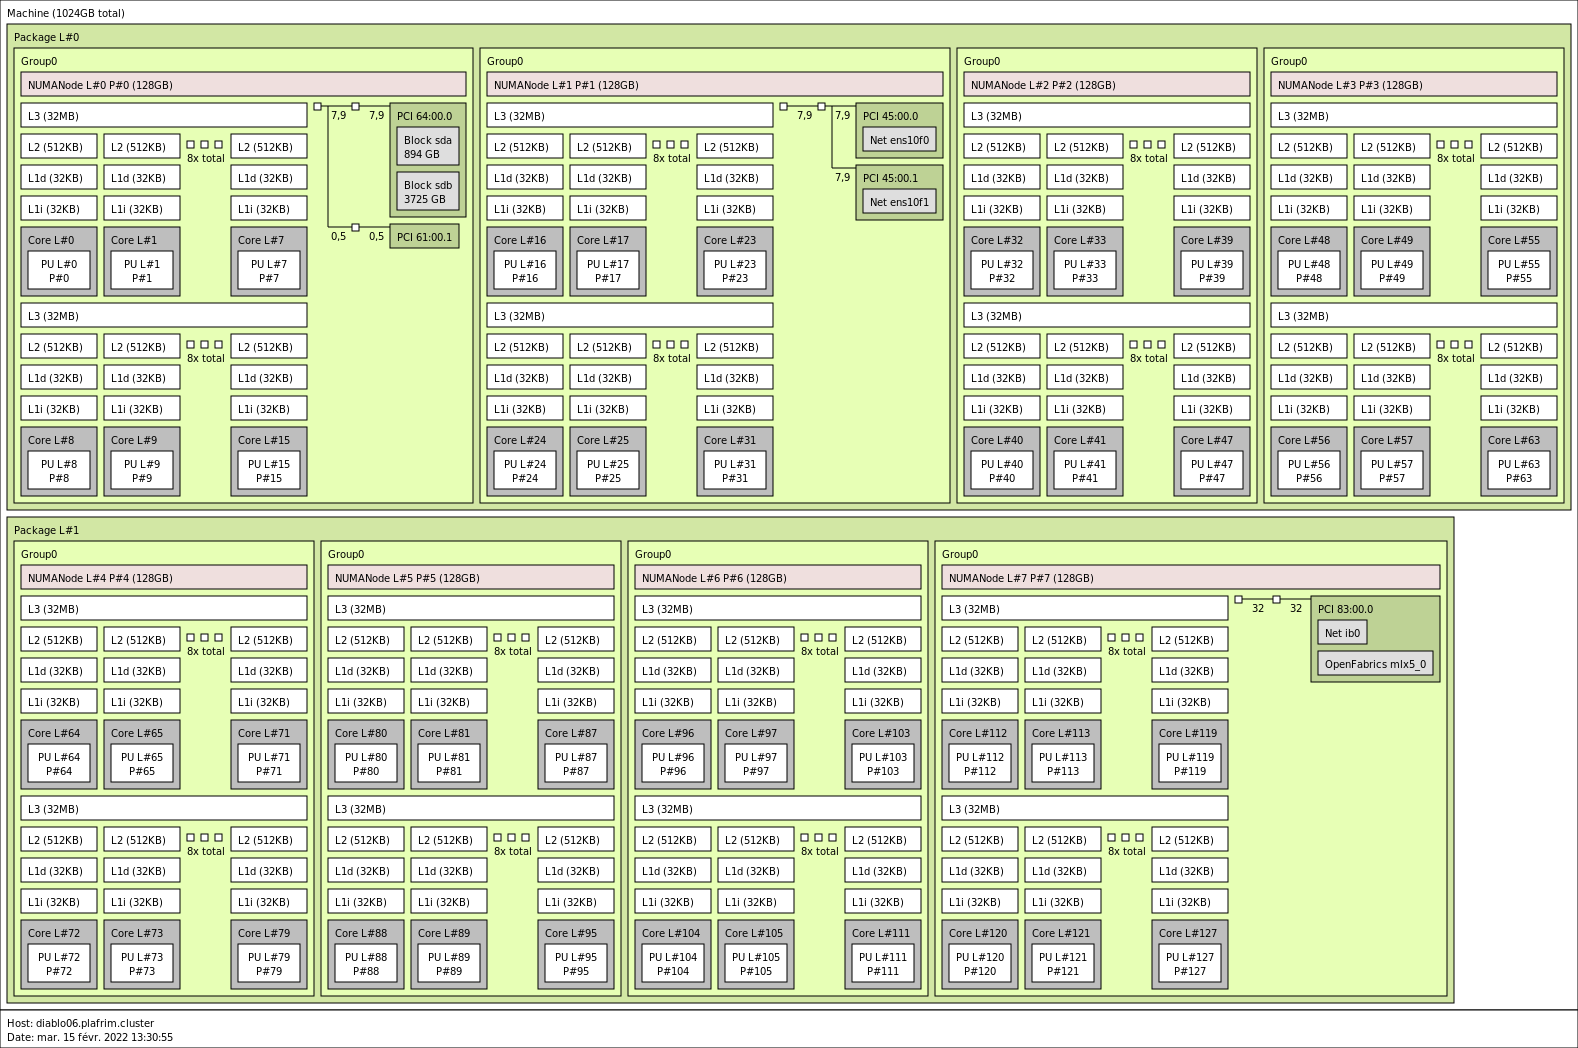
By default, Turbo-Boost and Hyperthreading are disabled to ensure the reproducibility of the experiments carried out on the nodes.
- Memory
256 GB (4 GB/core, with a single 128GB NUMA node per CPU) @ 2133 MT/s (diablo01-04).
1 TB (8 GB/core, with four 128GB NUMA nodes per CPU) @2133 MT/s (diablo05).
1 TB (8 GB/core, with a single 512GB NUMA node per CPU) @3200 MT/s (diablo06-09)
- Network
Mellanox InfiniBand HDR 200 Gbit/s.
10 Gbit/s Ethernet.
- Storage
Local disk (/tmp) of 1 TB (SATA Seagate ST1000NM0008-2F2 @ 7.2krpm) (diablo01-05).
Local disk (/scratch) of 4 TB (RAID0 of 4 HPE SATA-6G HDD @ 7.2krpm) (diablo06-09).
BeeGFS over 10G Ethernet.
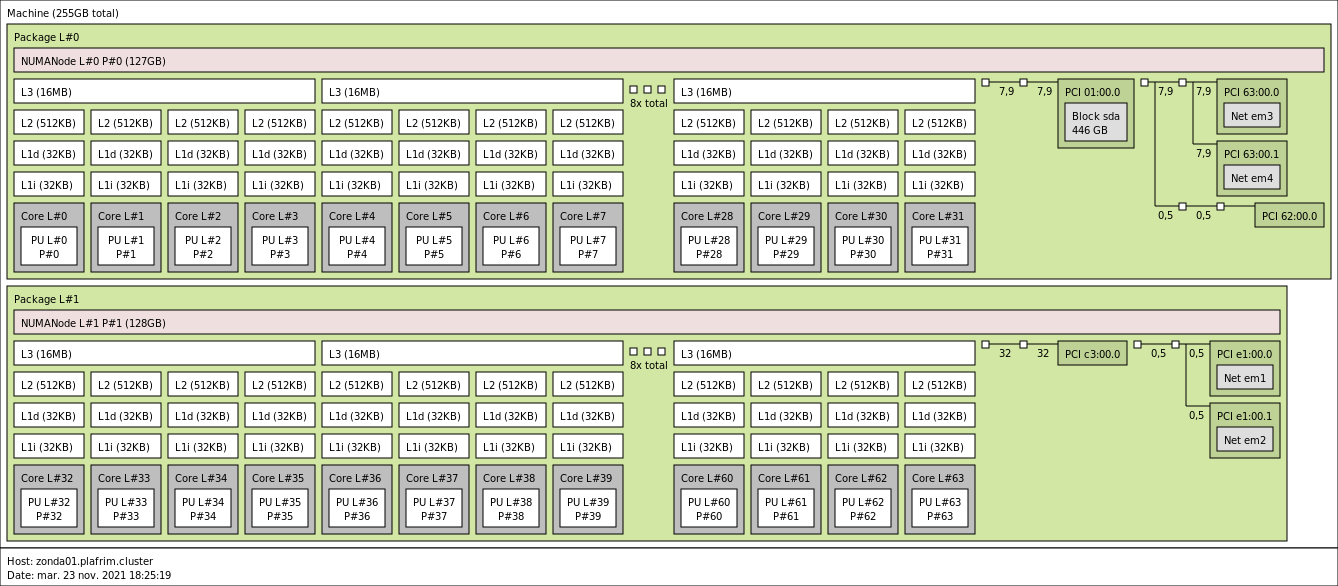
3.2.4. zonda01-21
- CPU
2x 32-core AMD Zen2 EPYC 7452 @ 2.35 GHz (CPU specs).
By default, Turbo-Boost and Hyperthreading are disabled to ensure the reproducibility of the experiments carried out on the nodes.
- Memory
- 256 GB (4 GB/core) @ 3200 MT/s.
- Network
- 10 Gbit/s Ethernet.
- Storage
- BeeGFS over 10G Ethernet.
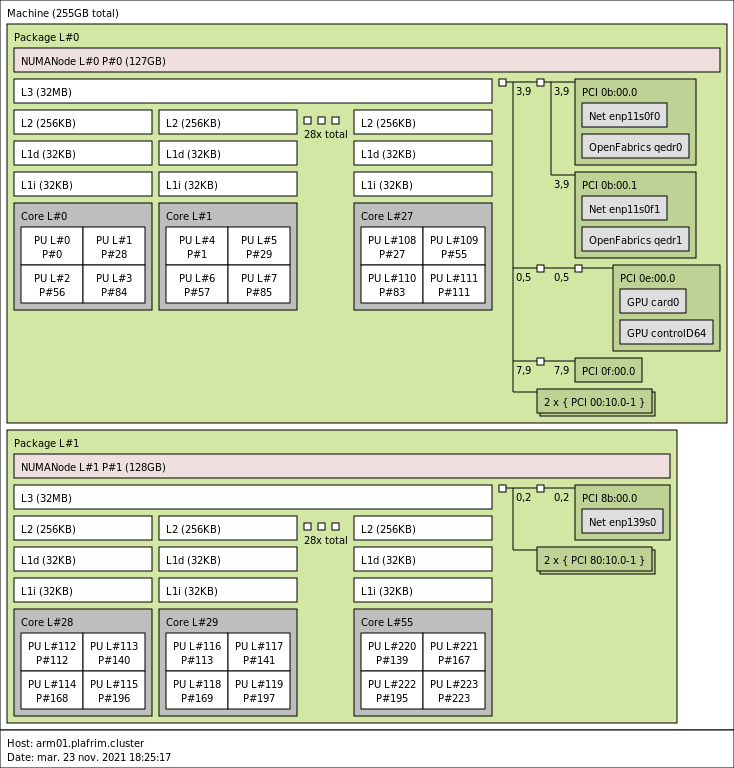
3.2.5. arm01
- CPU
2x 28-core ARM Cavium ThunderX2 CN9975 v2.1 @ 2.0 GHz (CPU specs).
By default, Turbo-Boost is disabled to ensure the reproducibility of the experiments carried out on the nodes.
However Hyperthreading is enabled on this node.
- Memory
- 256GB (4.6 GB/core) @ 2666 MT/s.
- Network
- 10 Gbit/s Ethernet.
- Storage
Local disk (/tmp) of 128 GB (SATA Seagate ST1000NM0008-2F2 @ 7.2krpm).
BeeGFS over 10G Ethernet.
3.3. Accelerated nodes
3.3.1. Which CUDA module to load?
Some old sirocco nodes have old GPUs that do not work with CUDA12. If you load the CUDA 12 module there, it will fail to work with the CUDA 11 driver. An easy way to load the appropriate cuda module is:
cudaversion=$(nvidia-smi -q | grep CUDA | awk {'print $4'})
module load compiler/cuda/$cudaversion
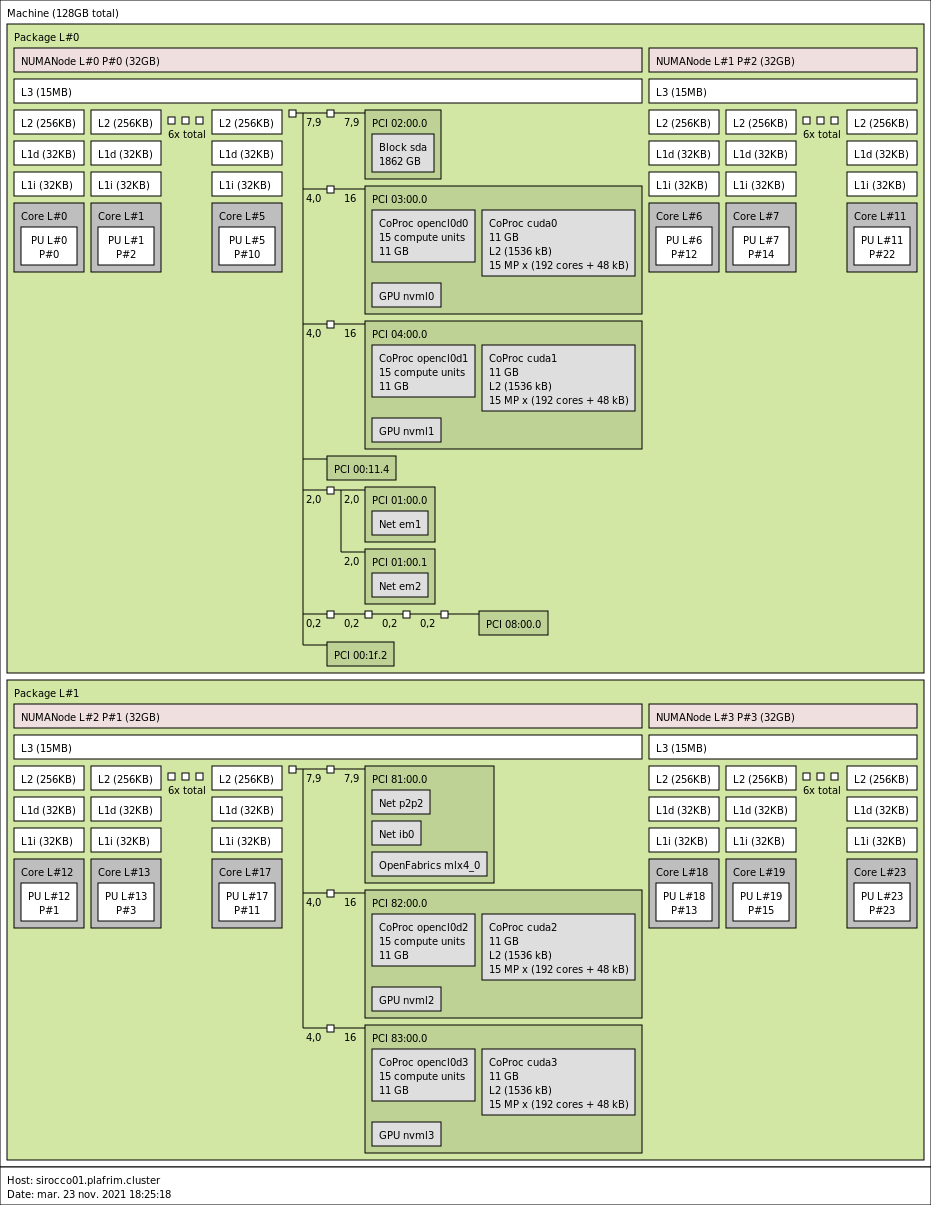
3.3.2. sirocco01-05 with 3-4 NVIDIA K40M GPUs
- CPU
2x 12-core Haswell Intel Xeon E5-2680 v3 @ 2.5 GHz (Haswell specs).
By default, Turbo-Boost and Hyperthreading are disabled to ensure the reproducibility of the experiments carried out on the nodes.
- Memory
- 128 GB (5.3 GB/core) @ 2133 MT/s.
- GPUs
4 NVIDIA K40M (12GB) on sirocco[01-02,05].
3 NVIDIA K40M (12GB) on sirocco[03-04].
- Network
Mellanox InfiniBand QDR 40 Gbit/s.
10 Gbit/s Ethernet.
- Storage
Local disk (/tmp) of 1 TB (SATA Seagate ST91000640NS @ 7.2krpm).
BeeGFS over 10G Ethernet.
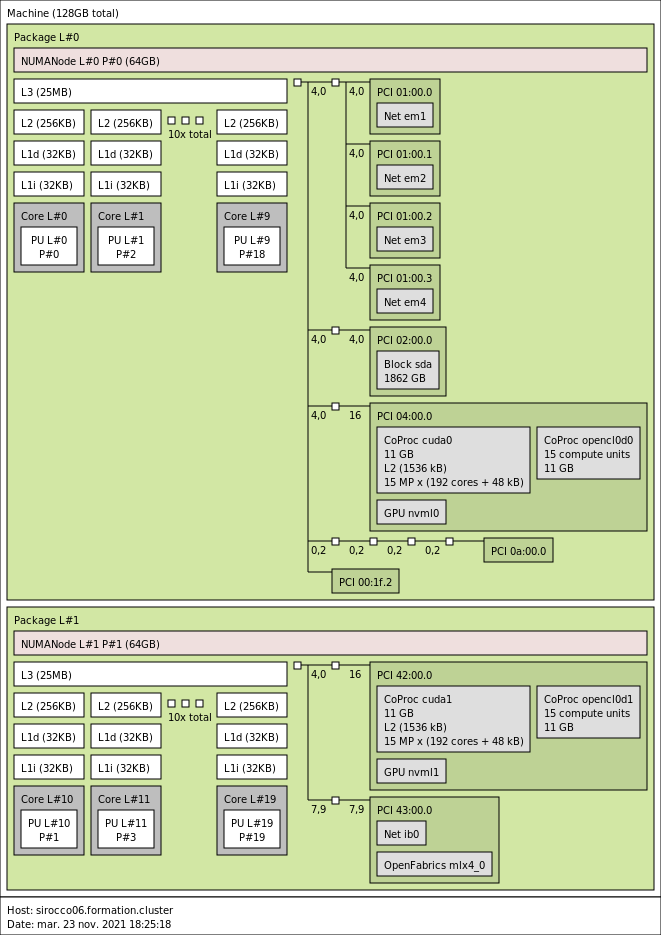
3.3.3. sirocco06 with 2 NVIDIA K40M GPUs
- CPU
2x 10-core Ivy-Bridge Intel Xeon E5-2670 v2 @ 2.5 GHz (Ivy Bridge specs).
By default, Turbo-Boost and Hyperthreading are disabled to ensure the reproducibility of the experiments carried out on the nodes.
- Memory
- 128 GB (6.4 GB/core) @ 1866 MT/s.
- GPUs
- 2 NVIDIA K40m (12GB).
- Network
Mellanox InfiniBand QDR 40 Gbit/s.
10 Gbit/s Ethernet.
- Storage
Local disk (/tmp) of 1 TB (SATA Seagate ST1000NM0023 @ 7.2krpm).
BeeGFS over 10G Ethernet.
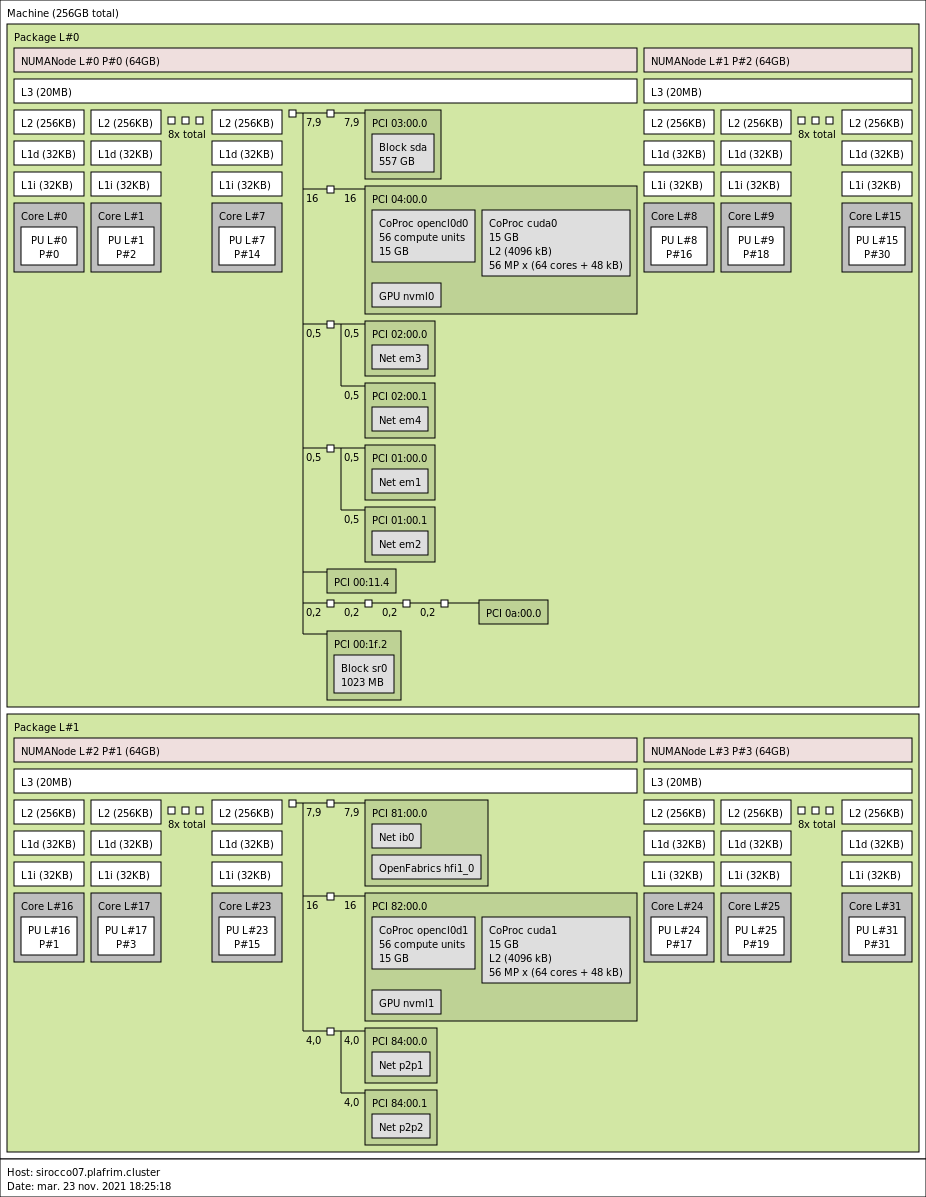
3.3.4. sirocco07-13 with 2 NVIDIA P100 GPUs
- CPU
2x 16-core Broadwell Intel Xeon E5-2683 v4 @ 2.1 GHz (Broadwell specs).
By default, Turbo-Boost and Hyperthreading are disabled to ensure the reproducibility of the experiments carried out on the nodes.
- Memory
- 256 GB (8GB/core) @ 2133 MT/s.
- GPUs
- 2 NVIDIA P100 (16GB).
- Network
Omnipath 100 Gbit/s.
10 Gbit/s Ethernet.
- Storage
Local disk (/tmp) of 300 GB (SAS WD Ultrastar HUC156030CSS204 @ 15krpm).
BeeGFS over 10G Ethernet.
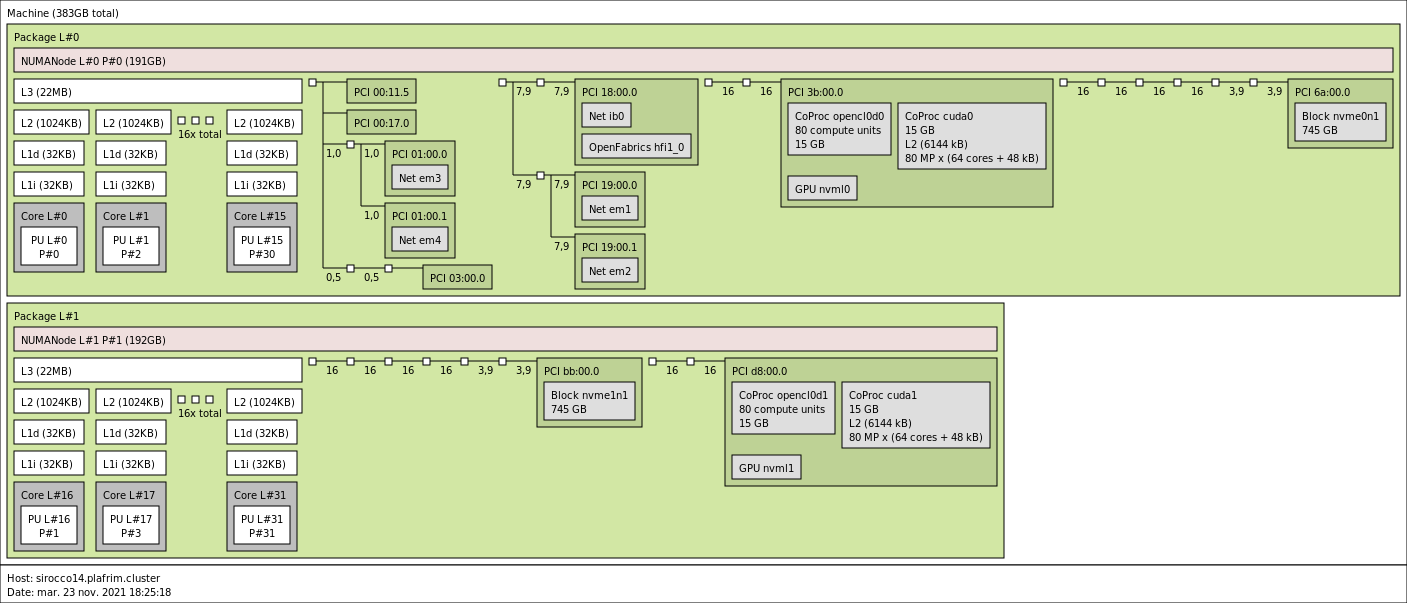
3.3.5. sirocco14-16 with 2 NVIDIA V100 GPUs and a NVMe disk
- CPU
2x 16-core Skylake Intel Xeon Gold 6142 @ 2.6 GHz (CPU specs).
By default, Turbo-Boost and Hyperthreading are disabled to ensure the reproducibility of the experiments carried out on the nodes.
- Memory
- 384 GB (12 GB/core) @ 2666 MT/s.
- GPUs
- 2 NVIDIA V100 (16GB).
- Network
Omnipath 100 Gbit/s.
10 Gbit/s Ethernet.
- Storage
Local disk (/scratch) of 750 GB (NVMe Samsung).
BeeGFS over 10G Ethernet.
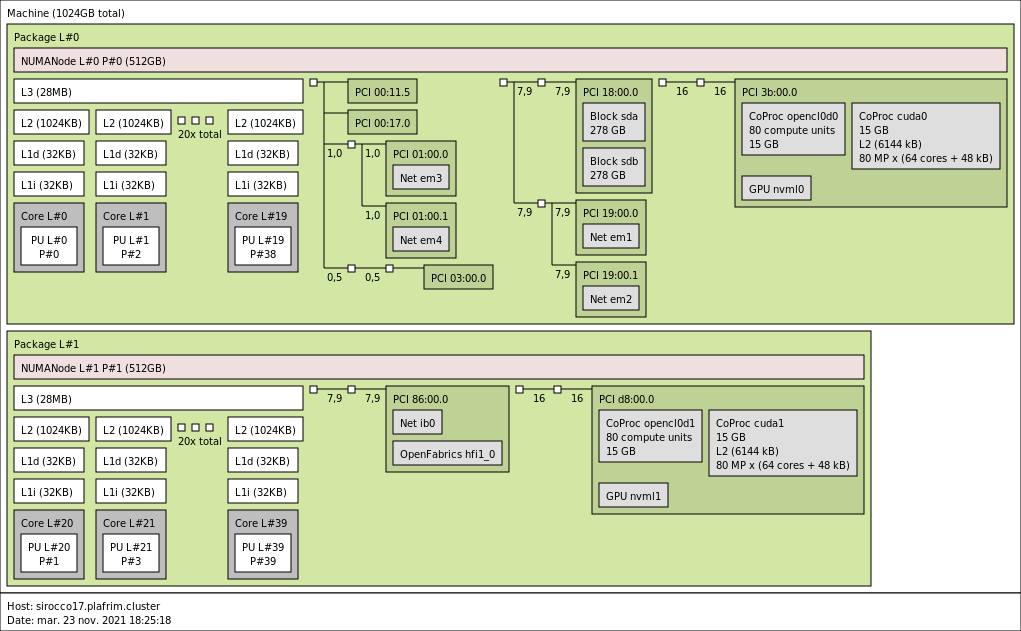
3.3.6. sirocco17 with 2 NVIDIA V100 GPUs and 1TB memory
- CPU
2x 20-core Skylake Intel Xeon Gold 6148 @ 2.4GHz (CPU specs).
By default, Turbo-Boost and Hyperthreading are disabled to ensure the reproducibility of the experiments carried out on the nodes.
- Memory
- 1 TB (25.6 GB/core) @ 1866 MT/s.
- GPUs
- 2 NVIDIA V100 (16GB).
- Network
Omnipath 100 Gbit/s.
10 Gbit/s Ethernet.
- Storage
Local disk (/tmp) of 1 TB (SAS Seagate ST300MP0026 @ 15krpm).
BeeGFS over 10G Ethernet.
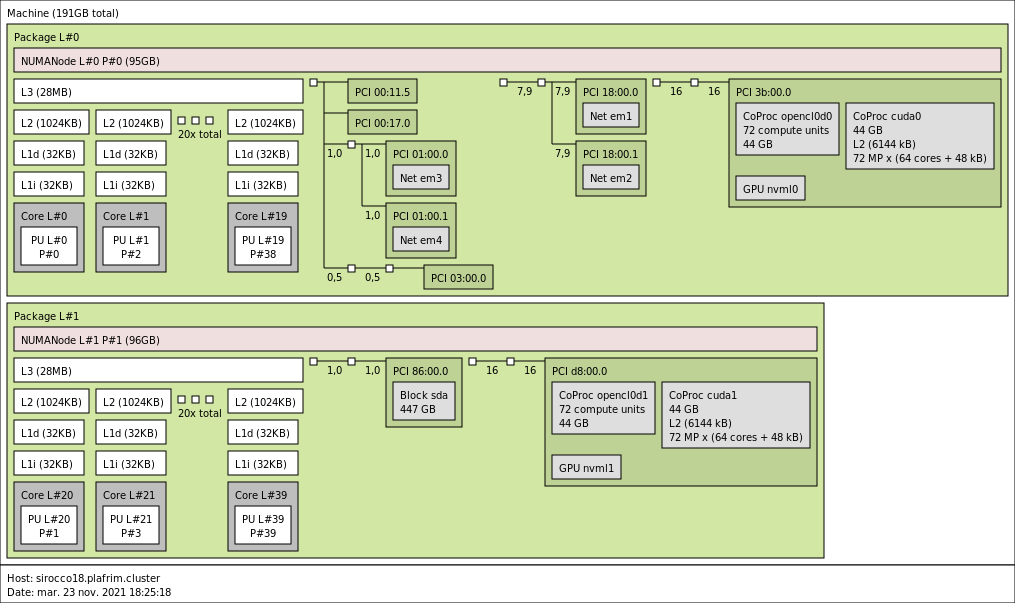
3.3.7. sirocco18-20 with 2 NVIDIA Quadro RTX8000 GPUs
- CPU
2x 20-core Cascade Lake Intel Xeon Gold 5218R CPU @ 2.10 GHz (CPU specs).
By default, Turbo-Boost and Hyperthreading are disabled to ensure the reproducibility of the experiments carried out on the nodes.
- Memory
- 192 GB (4.8GB/core) @ 3200 MT/s.
- GPUs
- 2 NVIDIA Quadro RTX8000 (48GB).
- Network
- 10 Gbit/s Ethernet.
- Storage
No local storage.
BeeGFS over 10G Ethernet.
3.3.8. sirocco21 with 2 NVIDIA A100 GPUs
- CPU
2x 24-core AMD Zen2 EPYC 7402 @ 2.80 GHz (CPU specs).
By default, Turbo-Boost and Hyperthreading are disabled to ensure the reproducibility of the experiments carried out on the nodes.
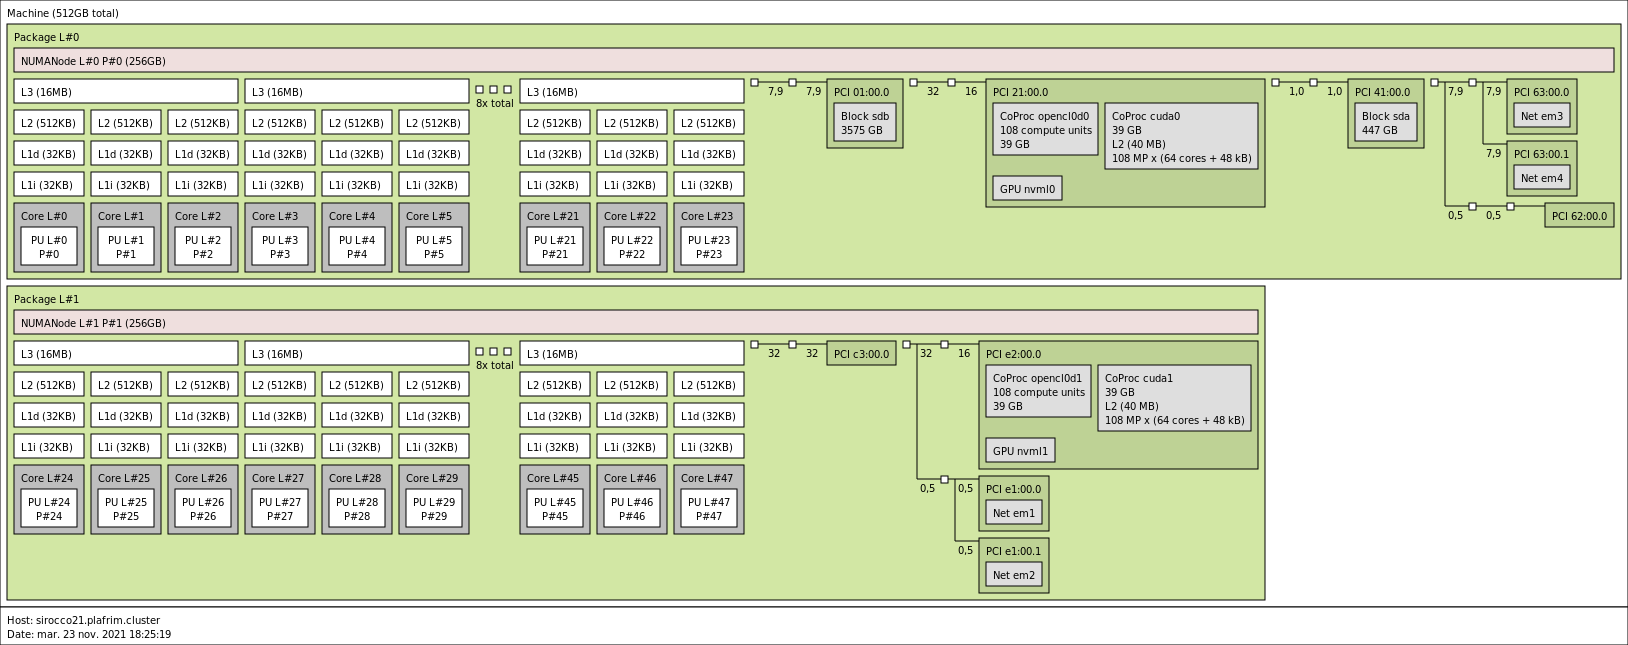
- Memory
- 512GB (10.6GB/core) @ 3200 MT/s.
- GPUs
- 2 NVIDIA A100 (40GB).
- Network
- 10 Gbit/s Ethernet.
- Storage
Local disk (/scratch) of 3.5 TB (RAID0 of 2 SAS SSD TOSHIBA KRM5XVUG1T92 Rm5 Mixed Use).
BeeGFS over 10G Ethernet.
3.3.9. sirocco22-25 with 2 NVIDIA A100 GPUs
- CPU
2x 32-core AMD Zen3 EPYC 7513 @ 2.60 GHz (CPU specs).
By default, Turbo-Boost and Hyperthreading are disabled to ensure the reproducibility of the experiments carried out on the nodes.

- Memory
- 512GB (8GB/core) @ 3200 MT/s.
- GPUs
- 2 NVIDIA A100 (40GB).
- Network
- 10 Gbit/s Ethernet.
- Storage
Local disk (/scratch) of 4 TB (RAID0 of 4 HPE SATA-6G HDD @ 7.2krpm).
BeeGFS over 10G Ethernet.
3.3.10. suet01 with 2 Intel Flex 170 GPUs
- CPU
2x 28-core Intel IceLake Xeon Gold 6330 @ 2 GHz.
By default, Turbo-Boost and Hyperthreading are disabled to ensure the reproducibility of the experiments carried out on the nodes.
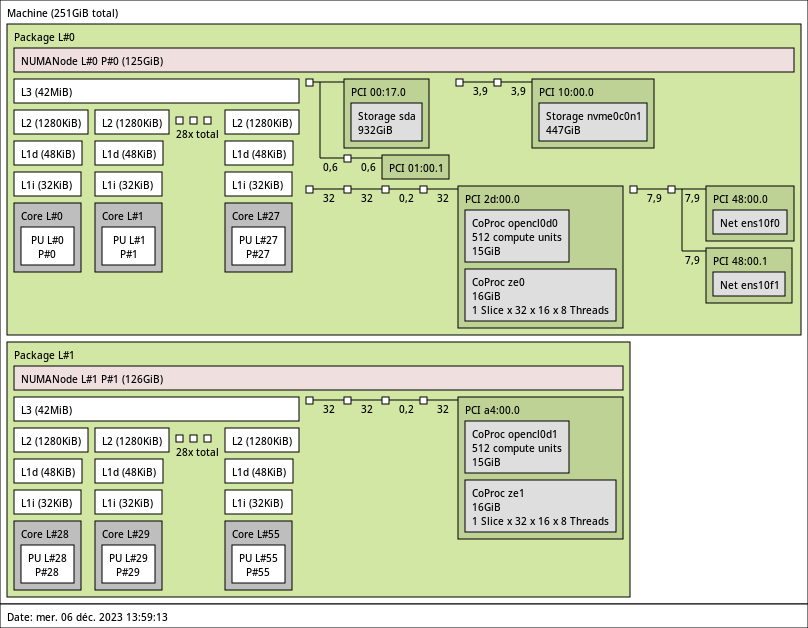
- Memory
- 256GB (4.6GB/core) @ 3200 MT/s.
- GPUs
- 2 Intel DataCenter GPU Flex 170 (16GB).
- Network
- 10 Gbit/s Ethernet.
- Storage
Local disk (/scratch) of 1 TB (SATA HDD @ 7.2krpm).
No BeeGFS over 10G Ethernet yet (
FIXME ).
3.3.11. suet02 with 2 Intel Max 1100 GPUs
- CPU
2x 56-core Intel SapphireRapids Xeon Platinum 8480+ @ 2 GHz.
Hyperthreading is currently enabled (
FIXME and turboboost ).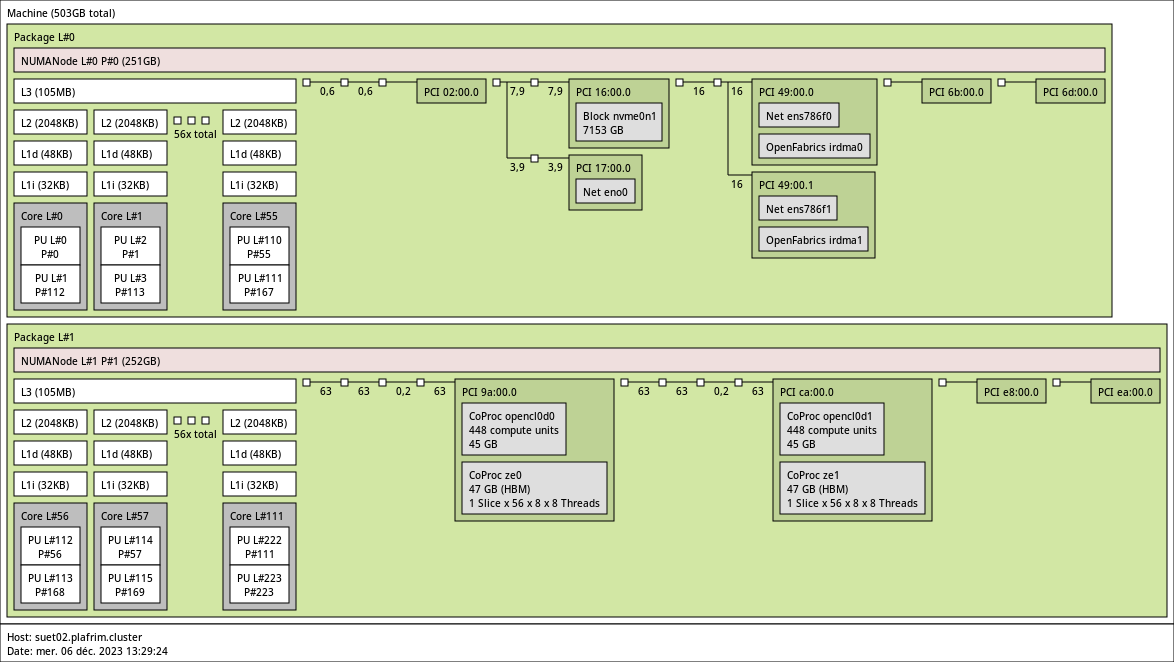
- Memory
- 512GB (4.6GB/core).
- GPUs
- 2 Intel DataCenter GPU Max 1100 (48GB).
- Network
- 10 Gbit/s Ethernet.
- Storage
- No BeeGFS over 10G Ethernet yet (
FIXME ).
3.3.12. kona01-04 Knights Landing Xeon Phi
- CPU
64-core Intel Xeon Phi 7230 @ 1.3 GHz (4 hyperthreads per core). (Airmont core specs)
By default, Turbo-Boost is disabled to ensure the reproducibility of the experiments carried out on the nodes.
However Hyperthreading is enabled on these nodes.
- Memory
96GB of DRAM (1.5GB/core) @ 2400 MT/s.
16GB of MCDRAM on-package (0.25GB/core).
- Network
Only 1 Gbit/s Ethernet.
Omnipath 100 Gbit/s.
- Storage
Local disk (/scratch) of 800 GB (SSD Intel SSDSC2BX80).
BeeGFS over 1G Ethernet.
- KNL configuration
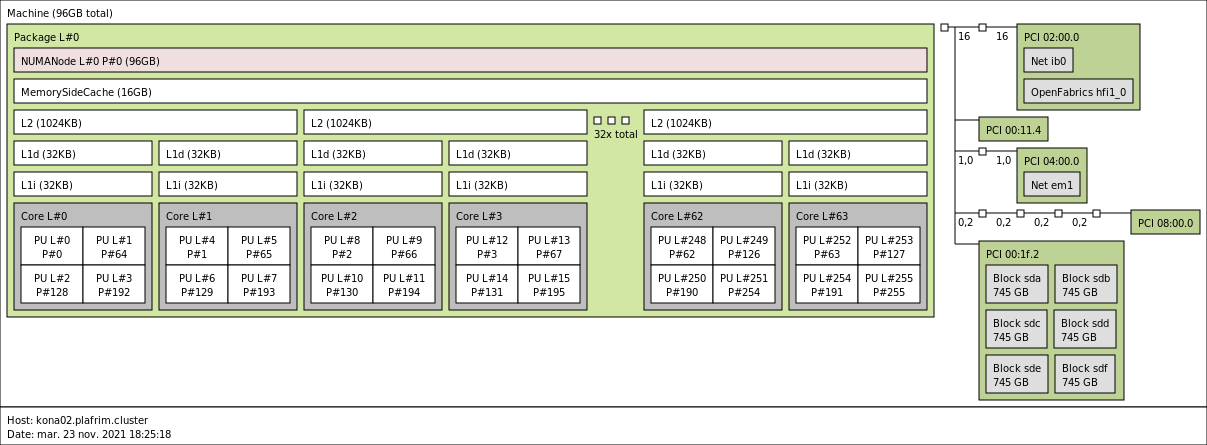
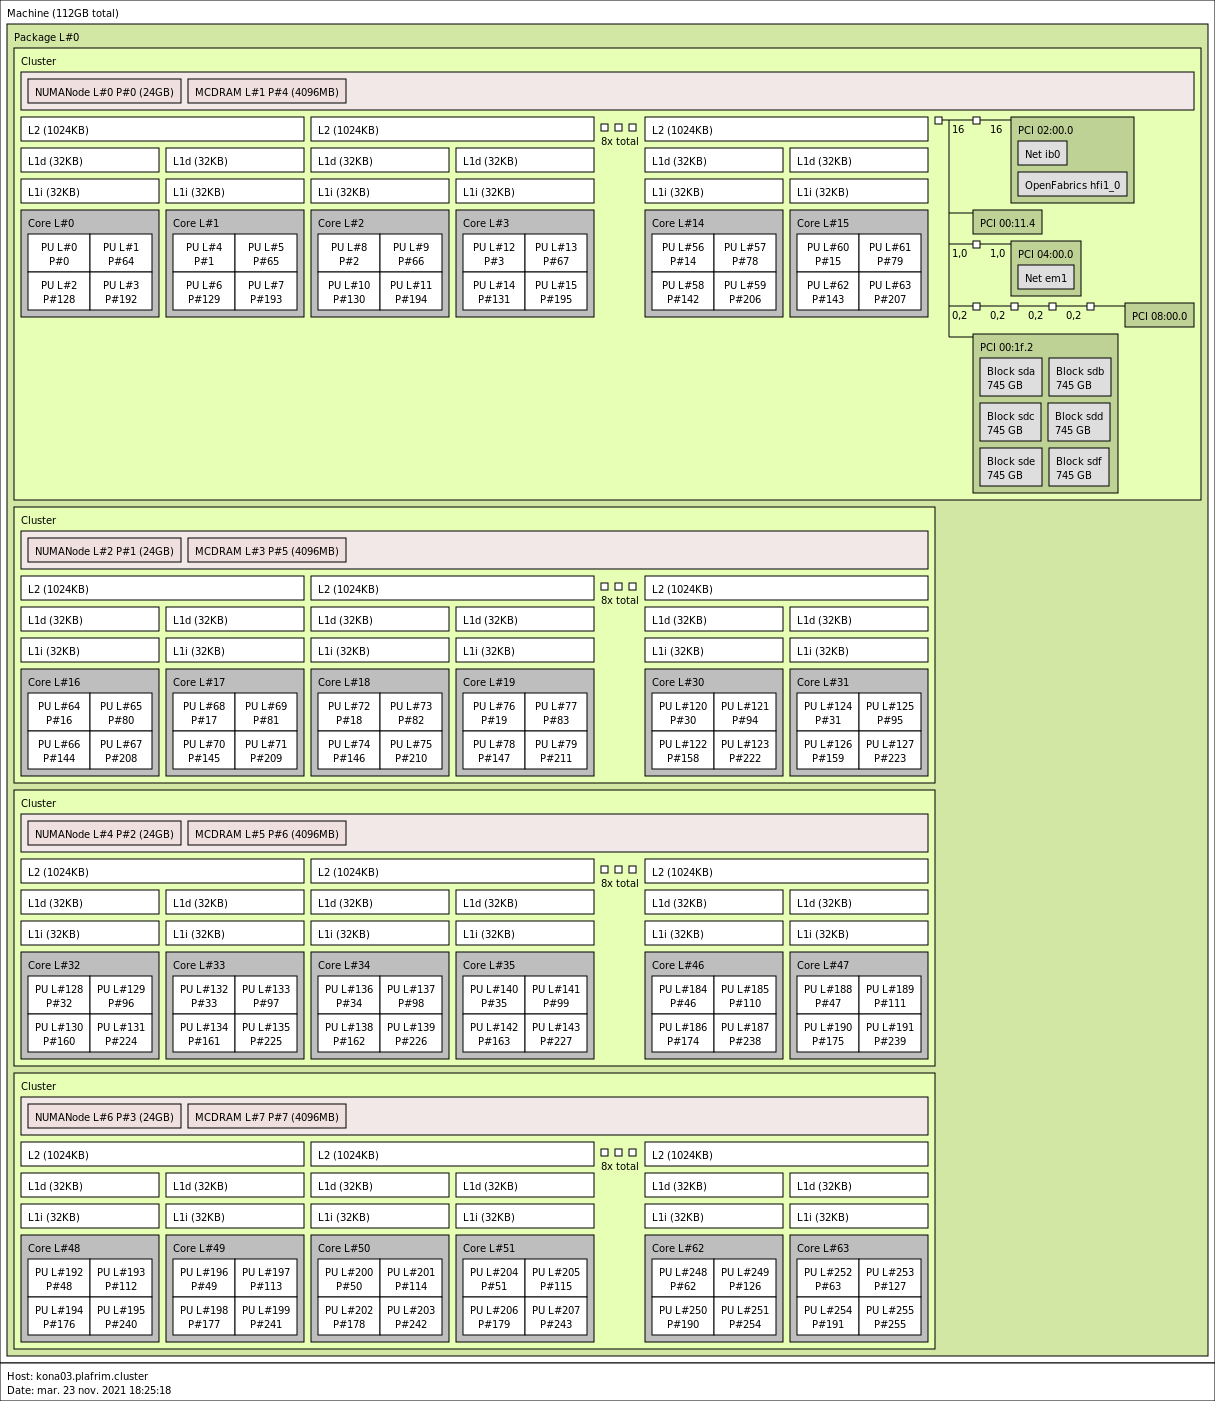
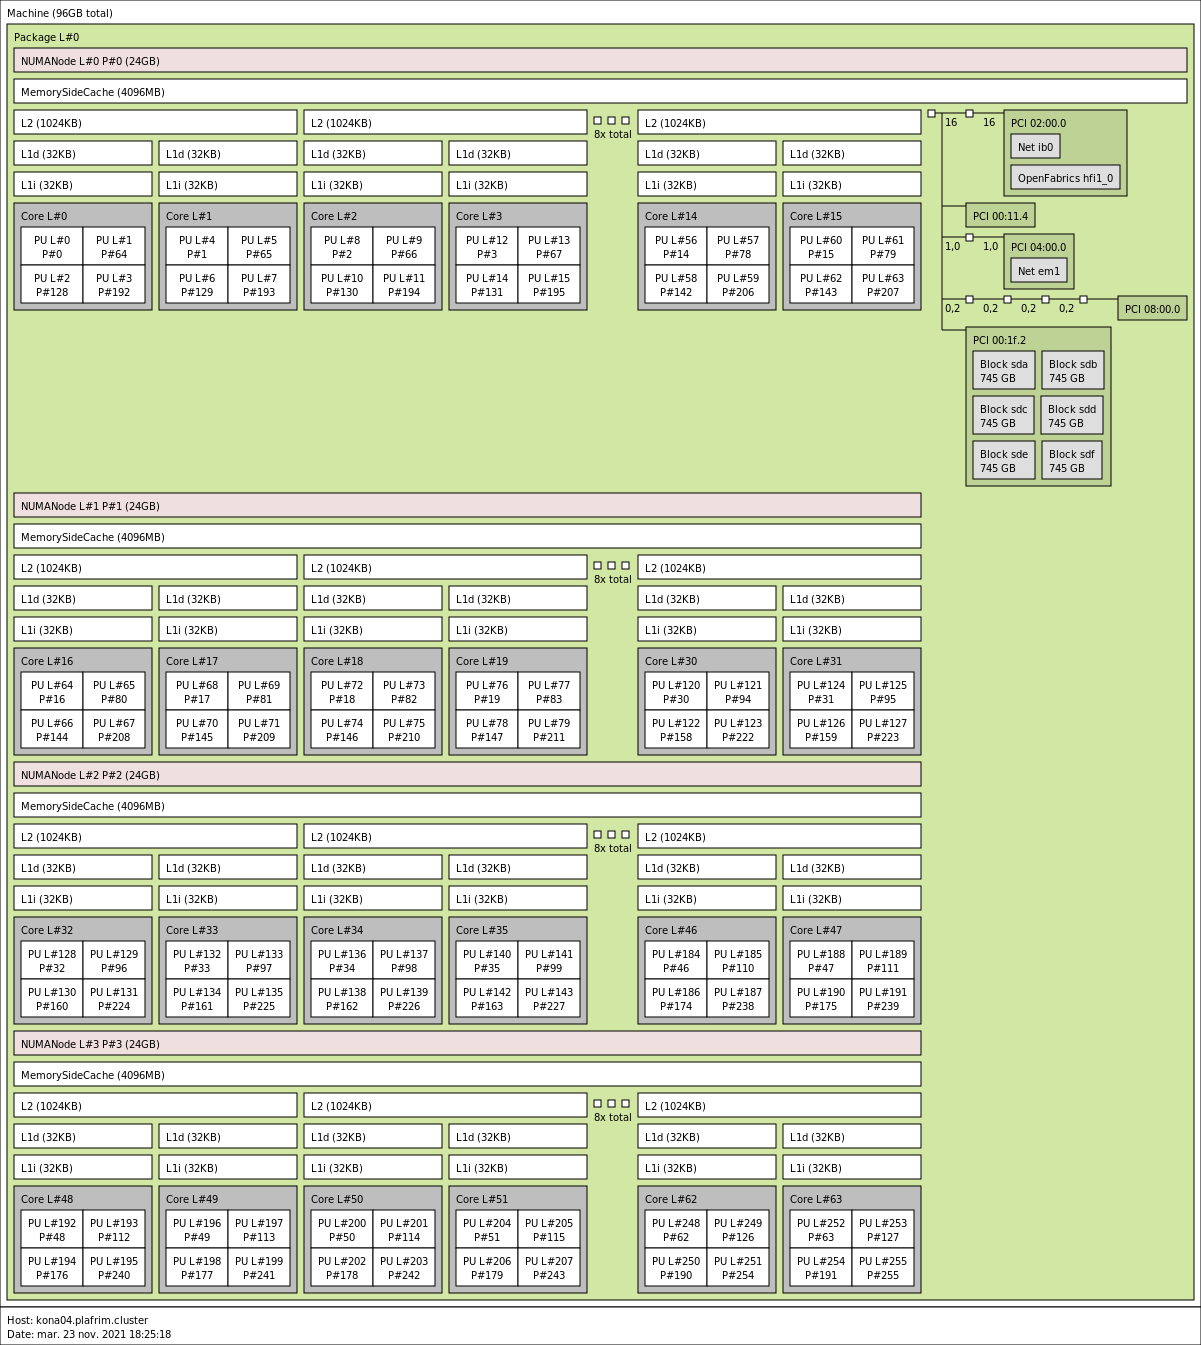
kona01 is in Quadrant/Flat: 64 cores, 2 NUMA nodes for DRAM and MCDRAM.
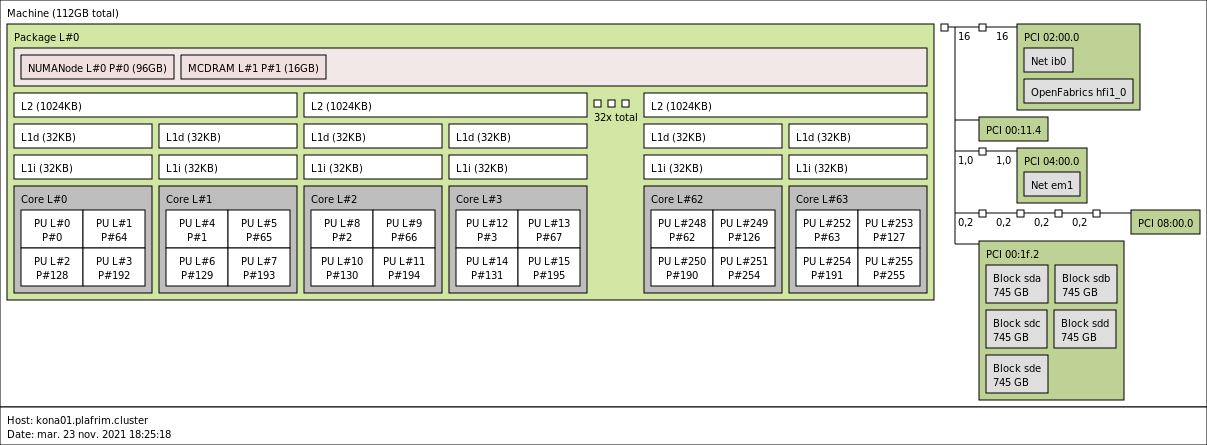
kona02 is in Quadrant/Cache: 64 cores, 1 NUMA node for DRAM with MCDRAM as a cache in front of it.
kona03 is in SNC-4/Flat: 4 clusters with 16 cores and 2 NUMA nodes each.
kona04 is in SNC-4/Cache: 4 clusters with 16 cores, 1 DRAM NUMA node and MCDRAM as a cache.
3.4. Big Memory Nodes
Two nodes are specifically considered as Big Memory nodes : brise and souris which are described below.
Some other nodes could be also considered as Big Memory nodes : diablo05-09 and sirocco17 as they have 1 TB of memory as described above.
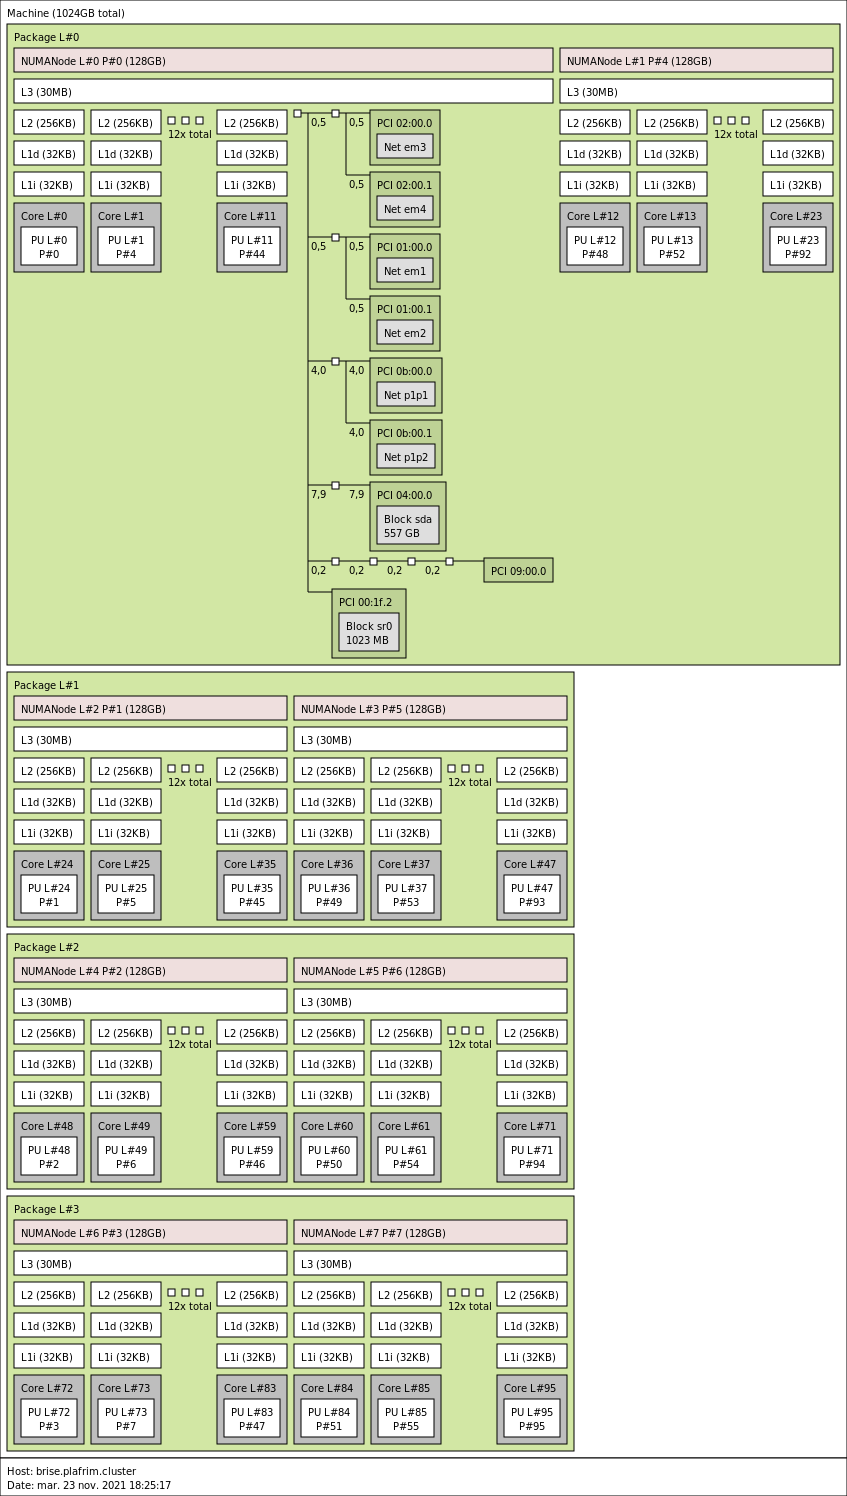
3.4.1. brise with 4 sockets, 96 cores and 1 TB memory
- CPU
4x 24-core Intel Xeon E7-8890 v4 @ 2.2GHz (CPU specs).
By default, Turbo-Boost and Hyperthreading are disabled to ensure the reproducibility of the experiments carried out on the nodes.
- Memory
- 1 TB (10.7 GB/core) @ 1600 MT/s.
- Network
- 10 Gbit/s Ethernet.
- Storage
Local disk (/tmp) of 280 GB (SAS @ 15krpm).
BeeGFS over 10G Ethernet.
3.4.2. souris (SGI Altix UV2000) with 12 sockets, 96 cores and 3 TB memory
- CPU
12x 8-core Intel Ivy-Bridge Xeon E5-4620 v2 @ 2.6 GHz (Ivy Bridge specs)
By default, Turbo-Boost and Hyperthreading are disabled to ensure the reproducibility of the experiments carried out on the nodes.
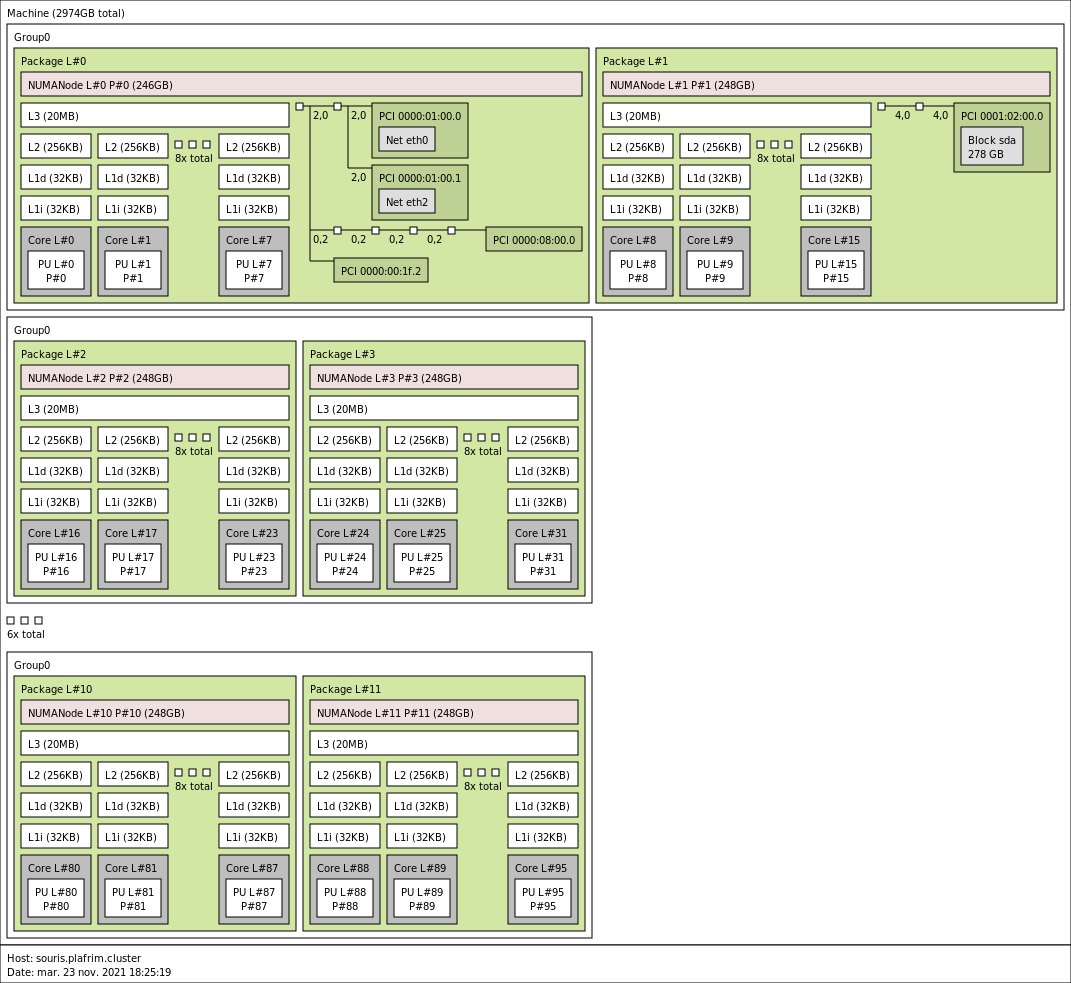
- Memory
- 3TB (32GB/core) @ 1600MT/s.
- Network
- 10 Gbit/s Ethernet.
- Storage
No local storage.
BeeGFS over 10G Ethernet.
4. Software Documentation
4.1. Operating System
CentOS (Community enterprise Operating System) Release 7.6.1810.
4.2. Slurm
SLURM (Simple Linux Utility for Resource Management) is a scalable open-source scheduler used on a number of world class clusters.
The currently installed SLURM version on PlaFRIM is 19.05.2.
You will find below a brief description to help users to launch jobs on the platform. More details are available in the official SLURM Quick Start User Guide and in the official SLURM documentation.
4.2.1. Getting Information About Available Nodes
You can see the list of all the nodes in the hardware documentation section.
To have the state of cluster go to https://www.plafrim.fr/state/
To allocate a specific category of node with SLURM, you need to specify the node features. To display the list, call the command:
$ sinfo -o "%60f %N"
AVAIL_FEATURES                                               NODELIST
miriel,intel,haswell,omnipath,infinipath                     miriel[001-043]
miriel,intel,haswell,infinipath                              miriel[044,048,050-053,056-058,060-064,066-073,075-076,078-079,081,083-086]
sirocco,intel,broadwell,omnipath,nvidia,tesla,p100           sirocco[07-13]
sirocco,amd,nvidia,ampere,a100                               sirocco21
amd,zen2,zonda                                               zonda[01-21]
bora,intel,cascadelake,omnipath                              bora[001-043]
amd,zen3,diablo,bigmem,mellanox                              diablo[06-09]
sirocco,intel,skylake,omnipath,nvidia,tesla,v100             sirocco[14-16]
sirocco,intel,skylake,omnipath,nvidia,tesla,v100,bigmem      sirocco17
sirocco,amd,zen3,nvidia,ampere,a100                          sirocco[22-24]
arm,cavium,thunderx2                                         arm01
brise,intel,broadwell,bigmem                                 brise
amd,zen2,diablo,mellanox                                     diablo[01-03]
amd,zen2,diablo,bigmem,mellanox                              diablo05
kona,intel,knightslanding,knl,omnipath                       kona[01-04]
sirocco,intel,haswell,mellanox,nvidia,tesla,k40m             sirocco[01-05]
Ivy                                                          sirocco06
sirocco,intel,skylake,nvidia,quadro,rtx8000                  sirocco[18-20]
souris,sgi,ivybridge,bigmem                                  souris
visu                                                         visu01
mistral                                                      mistral[02-03,06]
We will see below how to use specific nodes for a job, as an example, to reserve a bora node, you need to call
$ salloc -C bora
sinfo has many parameters, for example:
-N(--Node)- Print information in a node-oriented format.
-l(--long)- Print more detailed information.
$ sinfo -l
PARTITION AVAIL  TIMELIMIT   JOB_SIZE ROOT OVERSUBS     GROUPS  NODES       STATE NODELIST
routage*     up 3-00:00:00 1-infinite   no       NO        all     42    drained* miriel[001,005,008,010,016-017,020,022,024,027,043-045,048,050-053,057,060,062-064,067-071,073,075-076,078-079,081,083-088],sirocco[03-04]
routage*     up 3-00:00:00 1-infinite   no       NO        all      1  allocated* bora011
routage*     up 3-00:00:00 1-infinite   no       NO        all      3       down* miriel[019,038,056]
routage*     up 3-00:00:00 1-infinite   no       NO        all      1    draining zonda03
routage*     up 3-00:00:00 1-infinite   no       NO        all      4     drained bora009,miriel004,zonda[01-02]
routage*     up 3-00:00:00 1-infinite   no       NO        all      3       mixed miriel[002-003],sirocco07
routage*     up 3-00:00:00 1-infinite   no       NO        all     17   allocated bora[001-007],diablo[03-04],sirocco[01,14-17],zonda[04-06]
[…]

$ sinfo -N
NODELIST   NODES PARTITION STATE
arm01          1  routage* idle
bora001        1  routage* alloc
bora002        1  routage* alloc
bora003        1  routage* alloc
bora004        1  routage* alloc
bora005        1  routage* alloc
bora006        1  routage* alloc
bora007        1  routage* alloc
bora008        1  routage* idle
bora009        1  routage* drain
[…]
4.2.2. How to select nodes and how long to use them?
Nodes which are grouped by features, as explained above. To use a miriel node, you need to call
$ salloc -C miriel
If you only want to use a miriel node with omnipath, you need to call
$ salloc -C "miriel&omnipath"
The default time for a job is 1 hour, to specify another time
duration, you need to use --time=HH:MM:SS, e.g
for a 30 minutes job, you need to call
$ salloc --time=0:30:0
4.2.3. Which node(s) do I get by default?
If you do not specify any constraints, SLURM will try first to allocate nodes that do not have any advanced features. The idea is to avoid allocating rare nodes with advanced features (GPUs, large memory, high-speed network, etc) unless really needed.
The current weights for nodes are as follows:
- zonda
- miriel
- bora
- diablo
- sirocco
- arm01
- visu01
- kona
- brise
- souris
It means zonda nodes are allocated first when possible, while souris is only allocated when requested or when all other nodes are busy.
4.2.4. Running Interactive Jobs
salloc allows to run jobs with different steps, and use at each step all or a subset of resources.
$ salloc -N 3
salloc: Granted job allocation 1155503
salloc: Waiting for resource configuration
salloc: Nodes sirocco[01-03] are ready for job
The command squeue can be used to have a look at the job state:
$ squeue --job 17397
JOBID  PARTITION NAME  USER     ST  TIME  NODES NODELIST(REASON)
17397  routage   bash  bouchoui R   1:05  2     miriel[007-008]
In the same shell terminal, run srun your_executable (the command will use all the allocated resources).
$ srun hostname
sirocco01.plafrim.cluster
sirocco02.plafrim.cluster
sirocco03.plafrim.cluster

$ srun -N 1 hostname
sirocco01.plafrim.cluster
You can connect to the first node using
$ srun --pty bash -i
You can also login to one of the allocated nodes by using ssh however all slurm's variables environment will not be set.
$ ssh miriel007
Once connected to a node with ssh, if you want to run a command on all
allocated resources, you must run the srun command with the jobid
option followed by the id associated to your job.
@miriel007~$ srun --jobid=17397 hostname
miriel007
miriel008
One can also define the following arguments to the command srun
-N 1(or--nodes=1)- the node count, by default it is equal to 1.
-n 1(or--ntasks=1)- number of tasks, by default it is equal to 1, otherwise it must be equal to or less than the number of cores of the node
--exclusive- allocate node(s) in exclusive mode
You can also use directly srun without a salloc.
$ srun --pty bash -i
$ hostname
miriel004.plafrim.cluster
The option --pty also works when asking more than one node. You will
be connected to the first node. To see which are nodes are part of the
job, you can look at the environment variable SLURM_JOB_NODELIST.
4.2.5. Environment variables
When using srun, the environment variables may not be set properly,
for example the variable MODULEPATH will not be set properly wrt the
allocated node. You need to use --export=NONE, for example
$ srun --export=NONE -C haswell /bin/bash -lc 'yourcommand'
$ srun --export=NONE -C haswell /bin/bash -lc 'echo $HOSTNAME $MODULEPATH $SLURM_JOB_ID && cat /usr/share/Modules/init/.modulespath && module -t av compiler'
$ srun --export=NONE -C ivybridge /bin/bash -lc 'echo $HOSTNAME $MODULEPATH $SLURM_JOB_ID && cat /usr/share/Modules/init/.modulespath && module -t av compiler'
4.2.6. Running Non-Interactive (Batch) Jobs
$ cat script-slurm.sl
#!/usr/bin/env bash
# Job name
#SBATCH -J TEST_Slurm
# Asking for one node
#SBATCH -N 1
#SBATCH -n 4
# Standard output
#SBATCH -o slurm.sh%j.out
# Standard error
#SBATCH -e slurm.sh%j.err

echo "=====my job information ===="
echo "Node List: " $SLURM_NODELIST
echo "my jobID: " $SLURM_JOB_ID
echo "Partition: " $SLURM_JOB_PARTITION
echo "submit directory:" $SLURM_SUBMIT_DIR
echo "submit host:" $SLURM_SUBMIT_HOST
echo "In the directory:" $PWD
echo "As the user:" $USER

module purge
module load compiler/gcc
srun -n4 hostname
Launch the job using the command sbatch
$ sbatch script-slurm.sl
Submitted batch job 7421
to get information about the running jobs
$ squeue
and more...
$ scontrol show job <jobid>
to delete a running job
$ scancel <jobid>
to watch the output of the job 17421
$ cat slurm.sh17421.out
=====my job information ====
Node List:  zonda05
my jobID:  1461714
Partition:  routage
submit directory: /home/furmento
submit host: devel03.plafrim.cluster
In the directory: /home/furmento
As the user: furmento
zonda05.plafrim.cluster
zonda05.plafrim.cluster
zonda05.plafrim.cluster
zonda05.plafrim.cluster
4.2.7. Getting Information About A Job
There are 2 commands:
squeue$ squeue -o "%.18i %.9P %.8j %.8u %.2t %.10M %.6D %.3C %.20R" --job 17397The different header are:
- JOBID The job identifier
- PARTITION The partition on which the job is running, use
sinfoto display all partitions on the cluster. - NAME the name of job, to define or change the name (in batch mode) use
-J name_of_job. - USER the login of the job owner
- ST the state of submitted job PENDING, RUNNING, FAILED, COMPLETED, ... etc.
- TIME The time limit for the job (NOTE : if the user doesn't define the time limit for his job, the default time limit of the partition will be used).
- NODE Size of nodes.
- NODELIST List of nodes used.
The different job states are:
- PD (pending): Job is awaiting resource allocation,
- R (running): Job currently has an allocation,
- CA (cancelled): Job was explicitly cancelled by the user or system administrator,
- CF (configuring): Job has been allocated resources, but is waiting for them to become ready,
- CG (completing): Job is in the process of completing. Some processes on some nodes may still be active,
- CD (completed): Job has terminated all processes on all nodes,
- F (failed): Job terminated with non-zero exit code or other failure condition,
- TO (timeout): Job terminated upon reaching its time limit,
- NF (node failure): Job terminated due to failure of one or more allocated nodes.
scontrol.$ scontrol show job 1155454 JobId=1155454 JobName=plafrim-master-plafrim-gcc.sl UserId=furmento(10193) GroupId=storm(11118) MCS_label=N/A Priority=1 Nice=0 Account=(null) QOS=normal JobState=RUNNING Reason=None Dependency=(null) Requeue=1 Restarts=0 BatchFlag=1 Reboot=0 ExitCode=0:0 RunTime=00:06:15 TimeLimit=01:00:00 TimeMin=N/A SubmitTime=2021-01-19T08:34:06 EligibleTime=2021-01-19T08:34:06 AccrueTime=2021-01-19T08:34:06 StartTime=2021-01-19T08:34:06 EndTime=2021-01-19T09:34:06 Deadline=N/A SuspendTime=None SecsPreSuspend=0 LastSchedEval=2021-01-19T08:34:06 Partition=routage AllocNode:Sid=devel02.plafrim.cluster:300429 ReqNodeList=(null) ExcNodeList=(null) NodeList=sirocco08 BatchHost=sirocco08 NumNodes=1 NumCPUs=24 NumTasks=1 CPUs/Task=1 ReqB:S:C:T=0:0:*:* TRES=cpu=24,node=1,billing=24 Socks/Node=* NtasksPerN:B:S:C=0:0:*:* CoreSpec=* MinCPUsNode=1 MinMemoryNode=0 MinTmpDiskNode=0 Features=sirocco DelayBoot=00:00:00 OverSubscribe=NO Contiguous=0 Licenses=(null) Network=(null) Command=/home/furmento/buildbot/plafrim-master-plafrim-gcc.sl WorkDir=/home/furmento/buildbot StdErr=/home/furmento/buildbot/slurm-1155454.out StdIn=/dev/null StdOut=/home/furmento/buildbot/slurm-1155454.out Power=
Note that scontrol show job may show information about completed
jobs only during 5 minutes after they completed.
4.2.8. Asking for GPU nodes
The sirocco nodes have GPUs (see the Hardware Documentation section). You will need to specify the given constraints if you want a specific GPU card.
It is advised to use the exclusive parameter to make sure nodes are not used by another job at the same time.
$ srun --exclusive -C sirocco --pty bash -i

@sirocco08.plafrim.cluster:~> module load compiler/cuda

@sirocco08.plafrim.cluster:~> nvidia-smi
Tue Jan 19 10:52:07 2021
+-------------------------------------------------------------------+
| NVIDIA-SMI 460.27.04 Driver Version: 460.27.04 CUDA Version: 11.2 |
+-------------------------------------------------------------------+
| 0 Tesla P100-PCIE... | On | ...
| 1 Tesla P100-PCIE... | On | ...
[...]
4.2.9. Killing A Job
To kill all running jobs in batch session, use the scancel command with the login name option or with the list of job’s id (separated by space):
$ scancel -u <user>
or
$ scancel jobid_1 ... jobid_N
The command squeue can be used to get the job ids.
$ squeue
JOBID PARTITION NAME USER ST TIME NODES NODELIST(REASON)
2545 longq test1 bee R 4:46:27 1 miriel007
2552 longq test2 bee R 4:46:47 1 miriel003
2553 longq test1 bee R 4:46:27 1 miriel004
Interactive jobs can also be killed by exiting the current shell.
4.2.10. Launching multi-prog jobs
It is possible to run a job with several nodes and launch different programs on different set of nodes.
Here an example of such a multiprogram configuration file.
############################################################
# srun multiple program configuration file
#
# srun -n8 -l –multi-prog silly.conf
############################################################
4-6 hostname
1,7 echo task:%t
0,2-3 echo offset:%o
To submit such a file, use the following command
$ srun -n8 -l --multi-prog silly.conf
You will get a output similar to
4: miriel004.plafrim.cluster
6: miriel004.plafrim.cluster
5: miriel004.plafrim.cluster
7: task:7
1: task:1
2: offset:1
3: offset:2
0: offset:0
4.2.11. Submitting many jobs without flooding the platform
As explained here, you are not supposed to submit many large jobs that will occupy most of the platform at the same time. PlaFRIM does not strictly prevent you from submitting many jobs because many small jobs are fine. However users submitting large/long jobs are expected to manually take care of avoiding flooding the platform and reserving all nodes.
If you have many big jobs to submit, there are ways to defer them so that they occupy smaller parts of the platform at different times.
If you usually submit many jobs in a loop, just add a delay between them. For instance, instead of submitting 100 jobs of 72 hours each, you may for instance submit 10 of them now, and then wait for 72 hours and submit 10 more, etc. This is easy to implement in a script that may run in a screen or tmux on the devel nodes.
You may also ask SLURM to defer a job until another one has ended. The following lines submit jobs 123 and 124 immediately. 125 is submitted but it won't run until 123 has completed, etc.
$ sbatch job1.sl
Submitted batch job 123
$ sbatch job2.sl
Submitted batch job 124
$ sbatch --dependency afterany:123 job3.sl
Submitted batch job 125
$ sbatch --dependency afterany:124 job4.sl
Submitted batch job 126
$ sbatch --parsable --dependency afterany:125 job3.sl
127
$ sbatch --parsable --dependency afterany:126 job4.sl
128
The sbatch option --parsable makes the output line even more simple,
allowing to script this entire submission process.
To avoid launching large/long jobs during office hours, you can also specify the time when the job can start.
$ sbatch --begin=20:00 job1.sl
See the manpage of sbatch for more options to specify the start time.
4.3. Preemption queue
The queue preempt allows to run jobs outside the usual limits on
unused computing resources without blocking the access to the
resources for jobs running on the other queues.
This means jobs can be stopped ("preempted") suddenly at every moment if a regular job needs the resources.
The job will be restarted when the resources become available.
The code must regularly backup its state ("checkpoint") and make sure the backup is safe (the job could be stopped while backing up) and be able to restart on a previous backup.
The execution time is limited to 3 days. All nodes are reachable, to limit the execution on some nodes, you can use the nodes constraints. To know all the available constraints, one can use:
$ sinfo -o "%.100N %.12c %.20R %.90f"|grep preempt
NODELIST CPUS PARTITION AVAIL_FEATURES
miriel[044-045,048,050-053,056-058,060,062-064,067-071,073,075-076,078-079,081,083-088] 24 preempt miriel,intel,haswell,infinipath
miriel[001-006,008-043]                                                                 24 preempt miriel,intel,haswell,omnipath,infinipath
zonda[01-21]                                                                            64 preempt amd,zonda
4.3.1. Advises to backup your application state (checkpointing)
- Use a specific function to backup and another function to restore from a backup.
- Backup in a temporary file (or several files in a temporary directory), then rename (atomic operation) the file or directory with a final name to stamp the backup.
- If the application is stopped during the backup, the temporary backup will be ignored, the previous stamped backup will be used.
- When your application starts, it should first check if a backup is available, and if yes, use it to restart from it.
- Backing up should typically be done after a MPI barrier to make sure all nodes are synchronized.
- Backup frequency should be adapted to its duration (data writing on disk). A rough idea is that an application should not run for more than 30 mins to 1 hour without doing a backup.
4.4. Modules
4.4.1. Introduction
The Environment Modules package is a tool that simplifies shell initialization and lets users easily modify their environment during the session with module files.
Each module file contains the information needed to configure the
shell for an application. Once the Modules package is initialized, the
environment can be modified on a per-module basis using the module
command which interprets module files. Typically module files instruct
the module command to alter or set shell environment variables such as
PATH, MANPATH, etc. Module files may be
shared by many users on a system and users may have their own
collection to supplement or replace the shared module files.
Modules can be loaded and unloaded dynamically and atomically, in an clean fashion.
4.4.1.1. Example
By default, the compiler gcc is the one installed by the
system.
$ type gcc
gcc is /usr/bin/gcc
You can decide to use a specific one installed with a module.
$module load compiler/gcc/10.1.0 $ type gcc gcc is /cm/shared/modules/intel/skylake/compiler/gcc/10.1.0/bin/gcc
And decide to switch to another version.
$module switch compiler/gcc/9.2.0 $ type gcc gcc is /cm/shared/modules/intel/skylake/compiler/gcc/9.2.0/bin/gcc
and finally to come back to the default system compiler.
$module unload compiler/gcc/9.2.0 $ type gcc gcc is /usr/bin/gcc
4.4.1.2. Other module commands
module avail module list module purge
4.4.2. Module Naming Policy
To ease module management, they are sorted according to the architecture of the nodes, and grouped in categories
The different architectures are:
genericfor modules which can run on all nodesintel/haswellfor the nodesmirielandsirocco[01-05]intel/broadwellfor the nodessirocco[07-13]intel/skylakefor the nodesboraintel/knightslandingfor the nodeskona
When connecting to a node via salloc, the environment variable
MODULEPATH contains the directory generic and the node-specific
directory manufacturer/chip
Within each architecture, modules are grouped with the following module naming policy
/category/module/option/version
the number of options being between 0 and as many as needed.
For example
partitioning/scotch/int32/6.0.4partitioning/scotch/int64/6.0.4
4.4.3. Dev and Users Modules
- Modules managed by the technical team (MPI, GCC and CUDA compilers) are available in
/cm/shared/modules - User-managed modules are available in
/cm/shared/dev/modules - All users can install modules, one only needs to be added to the Unix group
plafrim-dev(ticket toplafrim-support AT inria.fr)
4.4.4. How to Create a Module
4.4.4.1. File System
- Modules files go in
/cm/shared/dev/modules/by following the architecture and the naming policies.architecture /modulefiles - Installation application files go in
/cm/shared/dev/modules/with the same architecture and naming policies.architecture /apps - For example, let's install for all nodes the version
1.1.8of the trace generator applicationeztrace- Install your application in
/cm/shared/dev/modules/generic /apps /trace/eztrace/1.1.8/ - Create the module file
/cm/shared/dev/modules/generic /modulefiles /trace/eztrace/1.1.8
- Install your application in
#%Module

proc ModulesHelp { } {
  puts stderr "\tAdds EzTrace 1.1.8 to your environment variables"
}

module-whatis "adds eztrace 1.1.8 trace generator tool to your environment variables"

set             name            eztrace
set             version         1.1.8
set             prefix          /cm/shared/dev/modules/generic/apps/trace/eztrace
set             root            $prefix/$version

#path added in the beginning
prepend-path   CPATH  $root/include
prepend-path   LIBRARY_PATH  $root/lib
prepend-path   LD_LIBRARY_PATH  $root/lib
# You might want to modify other relevant environment variables (eg PKG_CONFIG_PATH)
- Set the correct permissions
$module load tools/module_cat $ module_perm /cm/shared/dev/modules/generic/apps/trace/eztrace/1.1.8 $ module_perm /cm/shared/dev/modules/generic/modulefiles/trace/eztrace/1.1.8
4.4.4.2. Dependencies
If your module depends on other modules and has been compiled with different versions of this module.
First solution
- Define a single module file
/cm/shared/dev/modules/generic/modulefiles/perftools/simgrid/3.24 - specify the dependency(ies)
prereq compiler/gcc
$
module show compiler/gcc ... setenv GCC_VER 9.3.0 ...- and use their information
set prefix /cm/shared/dev/modules/generic/apps/perftools/simgrid/$version/install/gcc_$env(GCC_VER)
- Define a single module file
Second solution
- Define two different module files
/cm/shared/dev/modules/generic/modulefiles/perftools/simgrid/3.24/gcc_8.2.0/cm/shared/dev/modules/generic/modulefiles/perftools/simgrid/3.24/gcc_9.2.0
- To avoid loading 2 versions of the same module
conflict perftools/simgrid
- Define two different module files
4.4.5. What are the useful variables?
Path to development headers (for compiling)
prepend-path CPATH ...
prepend-path FPATH ...
prepend-path INCLUDE ...
prepend-path C_INCLUDE_PATH ...
prepend-path CPLUS_INCLUDE_PATH ...
prepend-path OBJC_INCLUDE_PATH ...
Path to libraries (for linking)
prepend-path LIBRARY_PATH ...
Path to tools and libraries (for running)
prepend-path PATH ...
prepend-path LD_LIBRARY_PATH ...
pkg-config to simplifying build systems (point to directories with .pc files)
prepend-path PKG_CONFIG_PATH $prefix/lib/pkgconfig
Manpages
append-path  MANPATH   $man_path
append-path  MANPATH   $man_path/man1
append-path  MANPATH   $man_path/man3
append-path  MANPATH   $man_path/man7
Some modules define specific variables, likely because one random project ever decided they need them...
setenv            CUDA_INSTALL_PATH   $root
setenv            CUDA_PATH           $root
setenv            CUDA_SDK            $root
prepend-path      CUDA_INC_PATH       $root/include

setenv          HWLOC_HOME          $prefix

setenv         MPI_HOME          $prefix
setenv         MPI_RUN           $prefix/bin/mpirun
setenv         MPI_NAME          $name
setenv         MPI_VER           $version
4.4.6. Which version gets selected by default during load?
The default is in (reverse) alphabetical order
$module avail formal/sage --- /cm/shared/dev/modules/generic/modulefiles --- formal/sage/7.0 formal/sage/8.9 formal/sage/9.0
$module load formal/sage $module list Currently Loaded Modulefiles: 1) formal/sage/9.0
Another default version may be enforced. Useful if your last beta release isn't stable or backward compatible but still needed for some hardcore users.
$ cat /cm/shared/dev/modules/generic/modulefiles/hardware/hwloc/.version
#%Module1.0#
set ModulesVersion "2.1.0"
4.4.7. More on environment dependent modules
$ module_grep starpu
runtime/starpu/1.3.2/mpi
runtime/starpu/1.3.2/mpi-fxt
runtime/starpu/1.3.3/mpi
runtime/starpu/1.3.3/mpi-cuda
runtime/starpu/1.3.3/mpi-cuda-fxt
runtime/starpu/1.3.3/mpi-fxt
StarPU has different module files which ONLY differ in the prereq commands and the prefix setting.
> prereq compiler/cuda/10.1
> prereq trace/fxt/0.3.9
< set     prefix          /cm/shared/dev/modules/generic/apps/runtime/starpu/1.3.3/gcc@9.2.0-hwloc@2.1.0-openmpi@4.0.2
> set     prefix          /cm/shared/dev/modules/generic/apps/runtime/starpu/1.3.3/gcc@8.2.0-hwloc@2.1.0-openmpi@4.0.1-cuda@10.1
> set     prefix          /cm/shared/dev/modules/generic/apps/runtime/starpu/1.3.3/gcc@8.2.0-hwloc@2.1.0-openmpi@4.0.1-cuda@10.1-fxt@0.3.9
Create a module file with all the cases
if {![ is-loaded compiler/gcc ]} {
   module load compiler/gcc
}
if {![ is-loaded hardware/hwloc ]} {
   module load hardware/hwloc/2.1.0
}

conflict runtime/starpu

set cuda ""
set fxt ""
if {[ is-loaded compiler/cuda/10.1 ]} {
  set cuda -cuda@10.1
}
if {[ is-loaded trace/fxt/0.3.9 ]} {
  set fxt -fxt@0.3.9
}

set     name            starpu
set     version         1.3.3

set     prefix /cm/shared/dev/modules/generic/apps/runtime/$name/$version/gcc@$env(GCC_VER)-hwloc@2.1.0-openmpi@4.0.1${cuda}${fxt}
Different environments lead to a different version of StarPU to be used.
4.4.7.1. 1st case
$module purge $module load runtime/starpu/42 $module list Currently Loaded Modulefiles: 1) compiler/gcc/9.2.0 2) hardware/hwloc/2.1.0 3) runtime/starpu/42
$module show runtime/starpu/42 setenv STARPU_DIR /cm/shared/dev/modules/generic/apps/runtime/starpu/1.3.3/gcc@9.2.0-hwloc@2.1.0-openmpi@4.0.1
4.4.7.2. 2nd case
$module purge $module load compiler/gcc/8.2.0 compiler/cuda/10.1 runtime/starpu/42 $module show runtime/starpu/42 setenv STARPU_DIR /cm/shared/dev/modules/generic/apps/runtime/starpu/1.3.3/gcc@8.2.0-hwloc@2.1.0-openmpi@4.0.1-cuda@10.1
4.4.7.3. 3rd case
$module purge $module load compiler/gcc/8.2.0 compiler/cuda/10.1 trace/fxt runtime/starpu/42 $module show runtime/starpu/42 setenv STARPU_DIR /cm/shared/dev/modules/generic/apps/runtime/starpu/1.3.3/gcc@8.2.0-hwloc@2.1.0-openmpi@4.0.1-cuda@10.1-fxt@0.3.9
4.4.8. More module commands
4.4.9. Module tools/module_cat
The module tools/module_cat provides the following tools
module_listto list the existing categoriesmodule_add,module_init,module_add,module_rmto modify the environment variable MODULEPATH which defines the folders in which to look for modulesmodule_permto set the correct permissions on a given directorymodule_searchto search all modules whose name have the given string, e.gmodule_search hwloc
4.5. Parallel Programming (MPI)
MPI usage depends on the implementation of MPI being used (for more details http://slurm.schedmd.com/mpi_guide.html).
We describe how to use OpenMPI and IntelMPI which are installed on PlaFRIM.
4.5.1. OpenMPI
Load your environment using the appropriate modules.
Currently, we provide the following OpenMPI implementations
$ module avail mpi/openmpi
mpi/openmpi/2.0.4 mpi/openmpi/3.1.4 mpi/openmpi/4.0.1
mpi/openmpi/4.0.1-intel mpi/openmpi/4.0.2 mpi/openmpi/4.0.2-testing
mpi/openmpi/4.0.3 mpi/openmpi/4.0.3-mlx
To use the 4.0.3 version
$ module load mpi/openmpi/4.0.3
To run a MPI program, you can use mpirun.
$ salloc -N 3

$ mpirun hostname
miriel040.plafrim.cluster
miriel041.plafrim.cluster
miriel042.plafrim.cluster

$ salloc -n 3

$ mpirun hostname
miriel023.plafrim.cluster
miriel023.plafrim.cluster
miriel023.plafrim.cluster
To compile a MPI application, you can use mpicc
mpicc -o program program.c
To run the program
mpirun --mca btl openib,self program
To launch MPI applications on miriel, sirocco and devel nodes :
$ mpirun -np <nb_procs> --mca mtl psm ./apps
If you need OmniPath interconnect :
$ mpirun -np <nb_procs> --mca mtl psm2 ./apps
For more details about how these different options work, you can see https://agullo-teach.gitlabpages.inria.fr/school/school2019/slides/mpi.pdf.
4.5.2. Intel MPI
Load your environment using the appropriate modules.
$ module avail mpi/intel
[...]
$ module add compiler/gcc compiler/intel mpi/intel
Create a file with the names of the machines that you want to run your job on:
$ srun hostname -s| sort -u > mpd.hosts
To run your application on these nodes, use mpiexec.hydra, and choose the fabrics for intra-node and inter-nodes mpi communcation:
$ export I_MPI_FABRICS=shm:tmi mpiexec.hydra -f mpd.hosts -n $SLURM_NNODES ./a.out
Choose your build and execution environment using modules, for instance:
$ module load compiler/gcc
$ module add compiler/intel
$ module add mpi/intel
Launch with mpiexec.hydra command:
$ srun hostname -s| sort -u > mpd.hosts
Select the particular network fabrics to be used with the environment variable I_MPI_FABRICS.
I_MPI_FABRICS=<fabric>|<intra-node fabric>:<inter-node fabric>
Where <fabric> := {shm, dapl, tcp, tmi, ofa}
For example, to select shared memory fabric (shm), for intra-node communication mpi process, and tag maching interface fabric (tmi), for inter-node communication mpi process, use the following command:
$ export I_MPI_FABRICS=shm:tmi
$ mpiexec.hydra -f mpd.hosts -n $SLURM_NPROCS ./a.out
The available fabrics on the platform are:
- tmi
- TMI-capable network fabrics including Intel True Scale Fabric, Myrinet, (through Tag Matching Interface)
- ofa
- OFA-capable network fabric including InfiniBand (through OFED verbs)
- dapl
- DAPL-capable network fabrics, such as InfiniBand, iWarp, Dolphin, and XPMEM (through DAPL)
- tcp
- TCP/IP-capable network fabrics, such as Ethernet and InfiniBand (through IPoIB)
You can also specify a list of fabrics, (The default value is dapl,tcp)with the environment variable I_MPI_FABRICS_LIST. The first fabric detected will be used at runtime:
I_MPI_FABRICS_LIST=<fabrics list>
Where <fabrics list> := <fabric>,…,<fabric>
(for more details visit https://software.intel.com/sites/products/documentation/hpc/ics/impi/41/lin/Reference_Manual/Communication_Fabrics_Control.htm)
4.6. Software management with GNU Guix
In addition to module, PlaFRIM users can manage software environments using GNU Guix, a general-purpose package manager.
4.6.1. Why use Guix?
Guix can be used in addition to and in parallel with module. There are several reasons why it might be useful to you:
- Guix provides more than 20,000 software packages including: utilities such as tmux, compiler toolchains (GCC, Clang), Python software (Scikit-Learn, PyTorch, NumPy, etc.), HPC libraries (Open MPI, MUMPS, PETSc, etc.).
- Pre-built binaries are usually available for packages you install, which makes installation fast.
- You get to choose when you upgrade or remove packages you've installed for yourself, and can roll back any time you want should an upgrade go wrong.
- You can reproduce the exact same software environment, bit-for-bit, on PlaFRIM and on other machines (laptop, cluster, etc.)
- Software environments can be "packed" as a Docker image for use on other systems.
4.6.2. Getting Started
4.6.2.1. Looking for packages
You can browse the on-line package list or use one of these commands:
guix package --list-available
guix search <keyword>
4.6.2.2. Installing Software
By default Guix installs software in your home directory, under
~/.guix-profile. On PlaFRIM, installing software with Guix
automatically updates your environment variables such that, on your
next login, PATH, PYTHONPATH, and similar variables point to
~/.guix-profile.
To install the latest GNU compilation toolchain, run:
guix install gcc-toolchain
To install Python 3.x along with NumPy and SciPy (note: the command is called
python3, notpython), run:guix install python python-numpy python-scipy
Viewing installed software:
guix package --list-installed
Setting search path environment variables:
$ eval `guix package --search-paths=prefix`Updating the package set:
guix pull
4.6.2.3. Dealing with "Profile Generations"
To list your "profile generations" (i.e., the successive changes to your set of installed packages):
guix package -l
To roll back to a previous generation of your "profile":
guix package --roll-back
4.6.3. Using the Guix-HPC Packages
We maintain a package collection for software developed by Inria research teams such as STORM, HiePACS, and TaDaaM in the Guix-HPC channel. This channel is enabled by default on PlaFRIM via `/etc/guix/channels.scm`, which means that running `guix pull` will give you Guix-HPC packages in addition to packages that come with Guix.
Non-free software such as CUDA, as well as variants of free software
packages with dependencies on non-free software (such as
starpu-cuda) are available in the Guix-HPC-non-free channel. Read the
instructions on how to add guix-hpc-non-free to your
~/.config/guix/channels.scm file.
If you have not updated your Guix repository for quite a while, you
may have a timeout error when running guix pull. To solve the
problem, you just need to call /usr/local/bin/guix pull. This will
update your repository, and you can go back to calling guix pull
afterwards.
4.6.4. Using CUDA
Once you have pulled the guix-hpc-non-free channel (see above), you
have access via Guix to several cuda-toolkit packages as well as
CUDA-enabled variants of HPC packages, such as starpu-cuda or
chameleon-cuda:
$ guix package --list-available=cuda
chameleon-cuda          1.1.0   debug,out       inria/tainted/hiepacs.scm:32:2
chameleon-cuda-mkl-mt   1.1.0   debug,out       inria/tainted/hiepacs.scm:60:2
cuda-toolkit            8.0.61  out,doc         non-free/cuda.scm:25:2
cuda-toolkit            11.0.3  out             non-free/cuda.scm:143:2
cuda-toolkit            10.2.89 out             non-free/cuda.scm:214:2
pastix-cuda             6.2.1   out             inria/tainted/hiepacs.scm:77:2
qr_mumps-cuda           3.0.4   out             inria/experimental.scm:30:2
starpu-cuda             1.3.9   debug,out       inria/tainted/storm.scm:69:2
starpu-cuda-fxt         1.3.9   debug,out       inria/tainted/storm.scm:116:2
To use them, you need to connect to a machine with CUDA devices and the actual CUDA driver (not provided by Guix) for example with:
salloc -C sirocco -N1
From there, you need to arrange so that /usr/lib64/libcuda.so (the
driver) gets loaded by setting LD_PRELOAD. The example below shows
how to do that with StarPU, running starpu_machine_display to ensure
StarPU detects CUDA devices:
$ LD_PRELOAD="/usr/lib64/libcuda.so" guix shell starpu-cuda -- starpu_machine_display
[starpu][check_bus_config_file] No performance model for the bus, calibrating...
[starpu][benchmark_all_gpu_devices] CUDA 0...
[starpu][benchmark_all_gpu_devices] CUDA 1...
[starpu][benchmark_all_gpu_devices] CUDA 2...
[starpu][benchmark_all_gpu_devices] CUDA 3...
[starpu][benchmark_all_gpu_devices] CUDA 0 -> 1...

[…]

4 STARPU_CUDA_WORKER workers:
        CUDA 0.0 (Tesla K40m 10.1 GiB 03:00.0)
        CUDA 1.0 (Tesla K40m 10.1 GiB 04:00.0)
        CUDA 2.0 (Tesla K40m 10.1 GiB 82:00.0)
        CUDA 3.0 (Tesla K40m 10.1 GiB 83:00.0)
No STARPU_OPENCL_WORKER worker

topology ... (hwloc logical indexes)
numa 0  pack 0  core 0  PU 0    CUDA 0.0 (Tesla K40m 10.1 GiB 03:00.0)  CUDA 1.0 (Tesla K40m 10.1 GiB 04:00.0)  CUDA 2.0 (Tesla K40m 10.1 GiB 82:00.0) CUDA 3.0 (Tesla K40m 10.1 GiB 83:00.0)

bandwidth (MB/s) and latency (us)...
from/to NUMA 0  CUDA 0  CUDA 1  CUDA 2  CUDA 3
NUMA 0  0       10518   10521   9590    9569
CUDA 0  10522   0       10251   9401    9382
CUDA 1  10521   10251   0       8810    8947
CUDA 2  8499    8261    9362    0       10250
CUDA 3  8670    8282    8667    10251   0

[…]
4.6.5. Creating Portable Bundles
Once you have a software environment that works well on PlaFRIM, you may want to create a self-contained "bundle" that you can send and use on other machines that do not have Guix. With guix pack you can create "container images" for Docker or Singularity, or even standalone tarballs. See the following articles for more information:
4.6.6. Support
For more information, please see:
Please send any support request to plafrim-guix@inria.fr.
4.7. 3D Visualization with VirtualGL and TurboVNC
- Install and setup on your desktop TurboVNC Viewer
Connect to plafrim :
$ module load slurm visu/srun
$ srun-visu
- The first time, TurboVNC will ask you for a password to secure the X11 session
Wait for a result like :
Waiting for a slot on a visualization serverUsing 3D visualization
with VirtualGL and TurboVNC

Desktop 'TurboVNC: visu01:1 (login)' started on display visu01:1

Starting applications specified in /home/login/.vnc/xstartup.turbovnc

Log file is /home/login/.vnc/visu01:1.log

Launched vncserver: visu01:1

Now, in another terminal, open a new SSH session to plafrim like this: "ssh plafrim -N -L 5901:visu01:5901 &" and launch TurboVNC viewer (vncviewer command) on your desktop on "localhost:1"
- Now open another SSH using the suggested command.
- In the Applications menu, you will find the Visit and Paraview softwares.
- In order to use a 3D (OpenGL) program via the CLI, put vglrun before the command, like:
vglrun paraview - Halting
srun-visu(via Ctrl-C ou scancel) or closing the first SSH session will stop the post-processing session. - On you desktop, run TurboVNC vncviewer
- vncviewer will ask you for the DISPLAY value (from previous command) and the session password.
Important : The default session time is limited to two hours. To specify a different session time, use :
$ srun-visu --time=HH:MM:SS
- A session time cannot exceed eight hours (
--time=08:00:00)
4.8. IRODS Storage Resource
4.8.1. Introduction
An iRODS Storage Resource is available at the MCIA (mésocentre Aquitain).
It allows to backup your research data.
4.8.2. Information
IMPORTANT : Encryption is not available (without authentication). Data are unencrypted both on the disks and on the network. If necessary, you need to encrypt data by yourself.
Data are scattered over 7 sites (Bordeaux and Pau).
IRODS keeps 3 copies of every file:
- one nearby the storage resource the data was first copied on,
- one at the MCIA (near Avakas),
- one in another storage resource.
Default quota : 500Gb.
4.8.3. How to use the system
One needs an account at the mesocentre. To do so, go to the page to request a Avakas account at inscriptions@mcia.univ-bordeaux.fr
Connect to the mesocentre to initialize your IRODS account, choose a specific password for iRODS. When loading the module, the iRODS account will be initialised.
$ ssh VOTRELOGIN@avakas.mcia.univ-bordeaux.fr
$ module load irods/mcia
On PlaFRIM - Prepare your environment by calling the command
iiintand answer the given questions.$ module load tools/irods $ iinit
- Host:
icat0.mcia.univ-bordeaux.fr - Port:
1247 - Zone:
MCI - Default Resource :
siterg-imb(for PlaFRIM) (from another platform, choosesiterg-ubx) - Password : ...
- Host:
The IRODS password can only be changed from Avakas
$ module load irods/mcia
$ mcia-irods-password
4.8.4. Basic commands
The list of all available commands can be found here.
4.8.4.1. FTP
icd [irods_path](change the working directory)imkdir irods_path(create a directory)ils [irods_path](list directory contents)iput locale_file[irods_path] (upload a file)iget irods_file[locale_path] (download a file)
4.8.4.2. rsync
irsync locale_path irods_path- Irods path start with « i: » : i:foo/bar
irsync foo i:bar/zzz- ~irsync i:bar/zzz foo
4.8.5. To go further
4.9. Continuous integration
4.9.1. May I run a Continuous Integration (CI) daemon on PlaFRIM?
Please do not run such daemons (gitlab runner, jenkins slaves, etc.) in your home account. You should rather use a dedicated PlaFRIM account as described below.
4.9.2. Which software projects are eligible for CI on PlaFRIM?
- Only projects hosted on
gitlab.inria.frand usinggitlab-runnerconnected to that server are eligible. - Only projects that need access to PlaFRIM-specific resources are eligible. This includes GPUs, CPUs within many cores, or multiple nodes for inter-node MPI communication. If the CI only involves building and running sequential codes, usual VMs should be used instead of PlaFRIM.
4.9.3. Creating a PlaFRIM CI manager for a gitlab project
First, your project must have a well-identified manager who will be responsible for CI jobs submitted on PlaFRIM (what code is executed, how many resources/jobs, etc).
As the manager, you should open a ticket with the following information:
- The URL of the gitlab.inria.fr project you want to perform CI against
- The username for the dedicated PlaFRIM account for CI for this project.
If the repository is at
gitlab.inria.fr/mygroup/myproject, the PlaFRIM username should begitlab-mygrouporgitlab-myprojectorgitlab-mygroup-myproject. - Your public SSH key.
As the submitter of the ticket, you will be responsible of the dedicated account. You are responsible for everything your CI scripts do on PlaFRIM. And youe must know who wrote the code that will be tested (e.g. no pull-requests from unknown contributors without human review).
Once the dedicated PlaFRIM account is created, you should verify that the SSH connection to the new account is working and proceed with the next sections below.
4.9.4. Configuring a gitlab-runner
This procedure MUST be performed in the dedicated gitlab-ci PlaFRIM account, not in your own personal account!
Use gitlab-runner available in a module:
$ module load tools/gitlab-runner
(several versions are available, new versions may be added if needed).
Register the runner in your gitlab project:
$ gitlab-runner register
Setup the URL and the token found in the gitlab web interface
(Settings -> CI/CD -> Runners -> Specific runners -> Set up a specific runner manually).
Setup tags such the project name, guix, plafrim, shell, etc.
Set shell as executor.
Open a tmux or screen (so that you may later close the SSH connection without killing the runner),
and launch the runner:
$ gitlab-runner run
Since the daemon may crash from time to time, you may want to use this convenience module script instead:
$ module load tools/gitlab-ci
$ gitlab-runner-keep-alive
The runner should appear in green in the gitlab web interface (Settings -> CI/CD -> Runners -> Specific runners -> Available specific runners).
4.9.5. Waiting for my SLURM jobs to end
Since CI scripts will likely submit batch jobs (with sbatch), they will terminate very quickly, much before the actual SLURM jobs are finished. The gitlab interface will only see the output of SLURM submissions, nothing about their completion with success or failure.
One way to wait for slurm job in the CI script is to pass
--wait to sbatch so that it does not return until the job
has completed.
To submit multiple jobs and let run simultaneously on the cluster,
one may use the bash built-in wait:
#!/bin/bash
# submit 3 jobs as background commands
sbatch --wait job1.sl &
sbatch --wait job2.sl &
sbatch --wait job3.sl &
# ask bash to wait for the completion of all background commands
wait
Note that SLURM also supports dependencies between jobs to wait for some completion before starting others:
$ sbatch job1.sl
Submitted batch job 123
$ sbatch job2.sl
Submitted batch job 124
$ sbatch job3.sl --dependency afterany:123:124
Once jobs are terminated, you may use their output files to generate the output of the CI script that will be visible from Gitlab.
TODO: In the future, a wrapper script may be available to submit one or several jobs, wait for their completion, and displays success/failure messages, and optionally dumps the output of each job.
4.9.6. Improving reproducibility
Reproducility can be improved with the usage of tools like GNU Guix whose usage on PlaFRIM is described here.
Reproducibility is possible if the guix identifiers that identify the whole software stack used are kept. The command
guix describe
outputs all the necessary information. Finally, storing it in a file like
Date                job_id         guix_id
26/01/2022 14:55:39 409328  guix-rev#guix_4883d7f#guix-hpc-non-free_c14b2a0#guix-hpc_a30a07f
will allow you to reproduce any software stack used for your tests. By the way, this file is also the right place to keep track of performance metrics... In order not to start from scratch, you could start from this Python example.
4.9.7. What is allowed in CI jobs?
Obviously CI jobs should not use 100% of PlaFRIM resources everyday. It means that you cannot submit a 1-hour long job on multiple nodes every 5 minutes just because you push one commit every 5 minutes.
Performing nightly testing (or during the week-end) is preferable since it will not disturb interactive jobs that usually run during office hours.
CI jobs should also never risk of disturbing the platform and users. For instance, like any human, they should not submit too many SLURM jobs, use too many resources, use the network or filesystem too intensively, run jobs on the front-end nodes, etc.
4.9.8. What if my CI job performs quite a lot of I/O?
If your CI job performs intensive I/Os, using BeeGFS instead of
your home directory is likely a good idea.
If so, ask the administrators for a /beegfs/gitlab-myproject directory.
Then tell the gitlab-runner to use it by editing .gitlab-runner/config.toml:
builds_dir = "/beegfs/gitlab-myproject/gitlab-runner/builds"
cache_dir = "/beegfs/gitlab-myproject/gitlab-runner/cache"
Restart the runner to apply these changes.
4.9.9. Do I need to restart my runner manually in case of hardware problem?
Gitlab runners currently run on front-end nodes such as devel01.
If the machine is ever rebooted, you have to restart your screen or tmux,
and re-launch the runner.
TODO: An automatic procedure is under discussion.
4.9.10. May I share a gitlab CI PlaFRIM account between multiple developers?
Each gitlab CI account on PlaFRIM is dedicated to a single gitlab project so that SLURM logs allow administrators to see how many hours of compute nodes were used by each project.
Although software projects are often managed by multiple users, the PlaFRIM gitlab CI account is currently limited to a single manager that is responsible for the entire account activity.
We encourage projects to designate a permanent researcher as the manager. However, if a manager leaves his/her research team and finds another manager to replace him/her, it is possible to transfer the responsibility by opening a ticket.
4.10. Energy savings (under TESTING )
We are testing the automatic shutting-down of idle nodes on PlaFRIM.
A few nodes are kept idle in case another job is submitted in the near future, others are off until needed. For now, it is only enabled on bora, miriel and zonda nodes. Other kinds of nodes will be involved later.
Several important changes are listed in the next subsections.
4.10.1. New node states
New symbols will appear in node states when running sinfo, here's a recap of the new ones :
- ~ : the nodes are shut down
- # : the nodes are currently powering up
- % : the nodes are currently powering down
Example with sinfo :
PARTITION AVAIL  TIMELIMIT  NODES  STATE NODELIST
routage*     up 3-00:00:00      3  idle~ bora[040,044],diablo04 # those nodes are shut down
routage*     up 3-00:00:00      2 alloc# sirocco25,zonda21      # those nodes are powering up
routage*     up 3-00:00:00      2  idle% miriel[087-088]        # those nodes are powering down
idle~ nodes are shut down but can be allocated !
4.10.2. salloc and srun behavior vs down nodes
There is no need to modify your submission commands or batch scripts. If one of your allocated nodes isn't ready, your job will still be created as usual (but it will wait for all nodes to be ready before starting, obviously). HOWEVER, you won't be able to connect to any of your nodes until every node of your job is ready (otherwise, ssh will fail saying that you don't have a job on the target node). Don't panic, you still have your allocation, you just need to wait.
If you want salloc to block until all of your nodes are ready, use --wait-all-nodes=1.
4.10.3. keepIdle jobs in squeue
You may see some jobs named "keepIdle" in the queue. Do not worry, it is part of the new mechanism. These jobs don't do anything (they are only meant to prevent some nodes for shutting too early), they will leave the queue as soon as they can.
If you ever see too many of the keepIdle jobs in the queue, it may be a bug in the energy saving system, please send the output of squeue and sinfo to the support team.
4.10.4. In case of node failure
Nodes that are powering up have a time limit to get ready. If they exceed the limit (currently 10 minutes), their state will be set to down~ and your job will be requeued.
Please let the administrators know when nodes are in the down~ state so they can check what caused the failure and so they can put the node back into service.
4.11. Other Development Tools
5. Incoming and Outgoing Access
5.1. Connecting to PlaFRIM
Your ssh must be configured properly to access PlaFRIM. Details are available in the private page How to connect? (requires sign-in) as well as in the email you received when your account was created.
5.2. Using a new SSH key
If you want to change the SSH key you are using to connect to PlaFRIM, there is 2 cases:
- if you still have access to PlaFRIM, copy your new key in the file
/.ssh/authorized_keysin your PlaFRIM account. You then need to wait for a maximum of 1 hour for the synchronization to be completed on the frontend, and thus be able to use the new key." - if you can no longer connect to PlaFRIM, send your new public key in
a ticket to
plafrim-support AT inria.fr.
5.3. Accessing an external site from PlaFRIM
Users must send a ticket to plafrim-support stating the site they need to access and the reason.
The technical team will approve the request after checking it does not lead to any technical issues (security…).
5.4. Accessing github.com
Working with GIT repositories hosted on github.com should automatically work if you checkout through https, for instance using URL https://github.com/group/project.git .
If you rather want to use SSH, you need a bit of ssh configuration before being able to checkout from a usual URL such as git@github.com:group/project.git . In .ssh/config, add:
#####  git clone git@github.com:group/project.git
Host github.com
    Hostname ssh.github.com
    Port 443
    User git
The above strategy may break when the IPs of ssh.github.com change. If this ever happens, it is possible to use SSH over HTTPS but it needs some configury to pass through the HTTP proxy:
#####  git clone git@github.com:group/project.git
host github.com
    Hostname ssh.github.com
    Port 443
    User git
    ProxyCommand /cm/shared/dev/modules/generic/apps/tools/socat/2.0.0-b8/install/bin/socat-2.0.0-b8/install/bin/socat - PROXY:proxy.plafrim.cluster:%h:%p,proxyport=3128
5.5. Accessing gitlab.com
Working with GIT repositories hosted on gitlab.com should automatically work if you checkout through https, for instance using URL https://gitlab.com/group/project.git .
If you rather want to use SSH, you need a bit of ssh configuration before being able to checkout from a usual URL such as git@gitlab.com:group/project.git . In .ssh/config, add:
#####  git clone git@gitlab.com:group/project.git
Host gitlab.com
    Hostname altssh.gitlab.com
    Port 443
    User git
The above strategy may break when the IPs of altssh.gitlab.com change.
6. Storage
6.1. Six storage spaces with different purposes
- /home/<LOGIN>
Max size : 20 Go
Deletion : Never
Hardware Protection (RAID) : Yes
Backup : Regular + versioning
Primary use : individual
How to obtain : automatic
Quota usage command : quota -f /home
- /projets/<PROJET>
Size : 200 Go
Deletion : Never
Hardware Protection (RAID) : Yes
Backup : Regular + versioning
Primary use : group. This space is a storage space that can be shared between several users to deposit data, software, …
How to obtain : on demand. To obtain such a space, simply send an email to Plafrim Support, specifying the name and description of the project, with the list of people connected to this project.
Quota usage command : du -sh /projets/<PROJET>
- DEPRECATED /lustre/<LOGIN>
Max size : 1 To
Deletion : Never
Hardware Protection (RAID) : Yes
Backup : No
Primary use : individual
How to obtain : automatic
Quota usage command : lfs quota -u <LOGIN> /lustre
- /beegfs/<LOGIN>
Max size : 1 To
Deletion : Never
Hardware Protection (RAID) : Yes
Backup : No
Primary use : individual
How to obtain : automatic
Quota usage command : beegfs-ctl --getquota --uid <LOGIN>
- /tmp
Max size : variable
Deletion : If needed and when restarting machines
Hardware Protection (RAID) : No
Backup : No
Primary use : individual
How to obtain : automatic
- /scratch
Max size : variable
Deletion : If needed and when restarting machines
Hardware Protection (RAID) : No
Backup : No
Primary use : individual
How to obtain : automatic. This space is only available on sirocco[14,15,16,21-25], diablo[06-09] and souris.
6.2. Restoring lost files
/home/<LOGIN> or /projets/<PROJET> have snapshots enabled and are replicated off-site for 4 weeks.
Snapshots are available in a .snapshot virtual subdirectory.
It is not visible in the output of ls or in the shell auto-completion,
but you may enter it with cd .snapshot anyway.
For instance /home/foo/bar/.snapshot/ contains several directories with the contents
of /home/foo/bar/ one hour ago, one day ago, one week ago, etc:
foo@devel03:~/bar$ cd .snapshot
foo@devel03:~/bar/.snapshot$ ls
daily.2022-04-10_2310/
daily.2022-04-11_2310/
[...]
hourly.2022-04-12_1307/
hourly.2022-04-12_1407/
[...]
weekly.2022-04-03_0510/
weekly.2022-04-10_0510/
6.3. Checking your storage quotas
For your home directory:
$ quota -v
[...]
Disk quotas for user mylogin (uid 1010002):
Système fichiers   blocs   quota  limite  sursisfichiers   quota  limite  sursis
10.151.255.252:/vol/imb_home/utilisateur
                13547264  20971520 20971520          192807  4294967295 4294967295
For your BeeGFS space:
$ beegfs-ctl --getquota --uid $USER
Quota information for storage pool Default (ID: 1):
      user/group     --||           size          ||    chunk files
     name     |  id    ||    used    |    hard    ||  used   |  hard
--------------|--------||------------|------------||---------|---------
       mylogin| 1010002||      0 Byte| 1024.00 GiB||        0|unlimited
For your Lustre space:
$ lfs quota -u $USER /lustre
Disk quotas for user mylogin (uid 1000288):
    Filesystem  kbytes   quota   limit   grace   files   quota   limit   grace
       /lustre 552835140       0 1000000000       - 7072977       0       0       -
Project spaces do not have a dedicated way to check the quota but the current disk usage is available through:
$ du -s /projets/<PROJECT>
6.4. Copying files outside PlaFRIM
6.4.1. Using scp
If you just need to copy files from PlaFRIM to your laptop, using
scp should be enough. Note that scp can only be used from your
local computer.
scp myfile plafrim:
scp plafrim:myfile .
Note that IRODS can also be used between PlaFRIM and the MCIA.
6.4.2. Using filesender
If you need to send huge files available on the PlaFRIM nodes, you can also use a command-line client for https://filesender.renater.fr/
Here some explanations on how to install and to use it.
- From your local computer
- go to https://filesender.renater.fr/?s=user. If you are not already connected to the service, connect first and go to the 'my profile' page by clicking on the rightmost icon in the upper menu.
- If you do not already have a API secret, create one.
- Click on the link 'Download Python CLI Client configuration' and
save the file
filesender.py.inion your computer.
- On PlaFRIM, install the client
mkdir -p ~/.filesender/ ~/bin/
copy the previously downloaded file in ~/.filesender/filesender.py.ini
wget https://filesender.renater.fr/clidownload.php -O ~/bin/filesender.py
chmod u+x ~/bin/filesender.py
python3 -m venv ~/bin/filesender
source ~/bin/filesender/bin/activate
pip3 install requests urllib3
- On PlaFRIM, use the client
source ~/bin/filesender/bin/activate
filesender.py -r recipient@domain.email File_to_send [File_to_send ...]
deactivate
An email will be sent to recipient@domain.email with a link to
download the file.
7. Misc
7.1. Citing PlaFRIM in your publications and in the HAL Open Archive
Don’t forget to cite PlaFRIM in all publications presenting results or contents obtained or derived from the usage of PlaFRIM.
Here's what to insert in your paper acknowlegments section :
Experiments presented in this paper were carried out using the PlaFRIM experimental testbed, supported by Inria, CNRS (LABRI and IMB), Université de Bordeaux, Bordeaux INP and Conseil Régional d’Aquitaine (see https://www.plafrim.fr).
When you deposit a publication in the Hal Open Archive, please add plafrim in the Project/Collaboration field of the metadata.
You may also check the current list of publications registered in HAL.
7.2. Getting Help
- For community sharing, basic questions, etc.
- contact plafrim-users or use the Mattermost server.
- To exchange more widely about the platform usage
- contact your representative in the user committee.
- For technical problem (access, account, administration, modules, etc)
- open a ticket by contacting plafrim-support.
For more details and links, see the private support page (requires login). Links to these resources are also given in the invite message when you open a SSH connection to PlaFRIM front-end nodes.
7.3. Changing my password for the website plafrim.fr
This is the usual wordpress password change procedure.
- Go to http://www.plafrim.fr/wp-login.php
- Click on “Lost your password ?”
- Enter either your PlaFRIM username (your SSH login) or the email address you used to create your PlaFRIM account, and click on “Get New Password”
- Check your email inbox
- Click on the link (the longer one) proposed within this email
- Choose your new password
- Test you can connect at http://www.plafrim.fr/connection/
7.4. Improving this documentation
- Fork the repository https://gitlab.inria.fr/plafrim-users/doc and clone it on your machine.
- Update source files web/*.org and push changes to your fork.
- Open a pull request.
- Thanks!